Google Cloud Platform (GCP) App [Legacy]
This content is being deprecated in favor of Google Cloud Platform Quickstart and will be removed in a future release.
We will continue to support our existing customers using this integration but recommend using the Google Cloud Platform Quickstart for your GCP monitoring use cases.
The Observe Google Cloud Platform (GCP) app streamlines the process of collecting data from GCP. A Pub/Sub topic makes logging and asset inventory information available and monitoring APIs expose metrics from several common GCP services at once. Observe pollers then ingest the data into your Observe environment.
The GCP app works with the datasets in your workspace. After setting up your GCP project for data collection, you can install and configure the GCP app in your Observe environment. Observe provides a Terraform module for setting up your GCP project. Contact us for assistance with completing these steps.
If you currently ingest GCP data, contact your Observe Data Engineer to see if the GCP app could enhance your existing data collection strategy.
What GCP Data Does Observe Ingest?
Standard Ingestion Sources
The GCP app automatically ingests the following types of data from a single project:
Asset Inventory - Metadata of GCP resources
Logs - Logs of services you use
Metrics - Metrics of services you use (if enabled)
Additional Ingestion Sources
With these previous sources configured and working, add additional services by enabling them in the GCP app interface. Details for common services may be found in the Observe documentation:
BigQuery - analytics data warehouse
Cloud Functions - serverless compute functions
Cloud Load Balancing - traffic load balancing
Cloud Run - serverless container platform
Cloud Storage - object storage
Cloud SQL - databases
Compute - virtual machines
Using the GCP App Data
Data coming into Observe through the GCP app populates datasets such as the following:
Asset Inventory
Asset Inventory Records - Raw data from asset exports
Resource Asset Inventory Records - All cloud assets in GCP that provide the basis for resource datasets
Metrics
Metrics - Periodically, typically every 60 seconds, sample metrics from GCP
Distribution Metrics - Services use this value type when the individual measurements become too numerous to collect, but statistical information, such as averages or percentiles, about those measurements, can be valuable.
Resource datasets
Cloud Functions
Cloud SQL Instance
Compute Instance
Projects
Storage Buckets
Setup Overview
Observe provides a Terraform module that creates service accounts, log sink, and a Pub/Sub topic as well as the subscription needed by Observe pollers for your GCP Project. (Observe Google Collection GitHub repository). You can also follow the instructions for the GCP console tab in the Installation Section to provision those resources.
Observe pollers, using your created service account key, extract assets, logs, metrics, and project data and send it into your Observe account at a set interval.
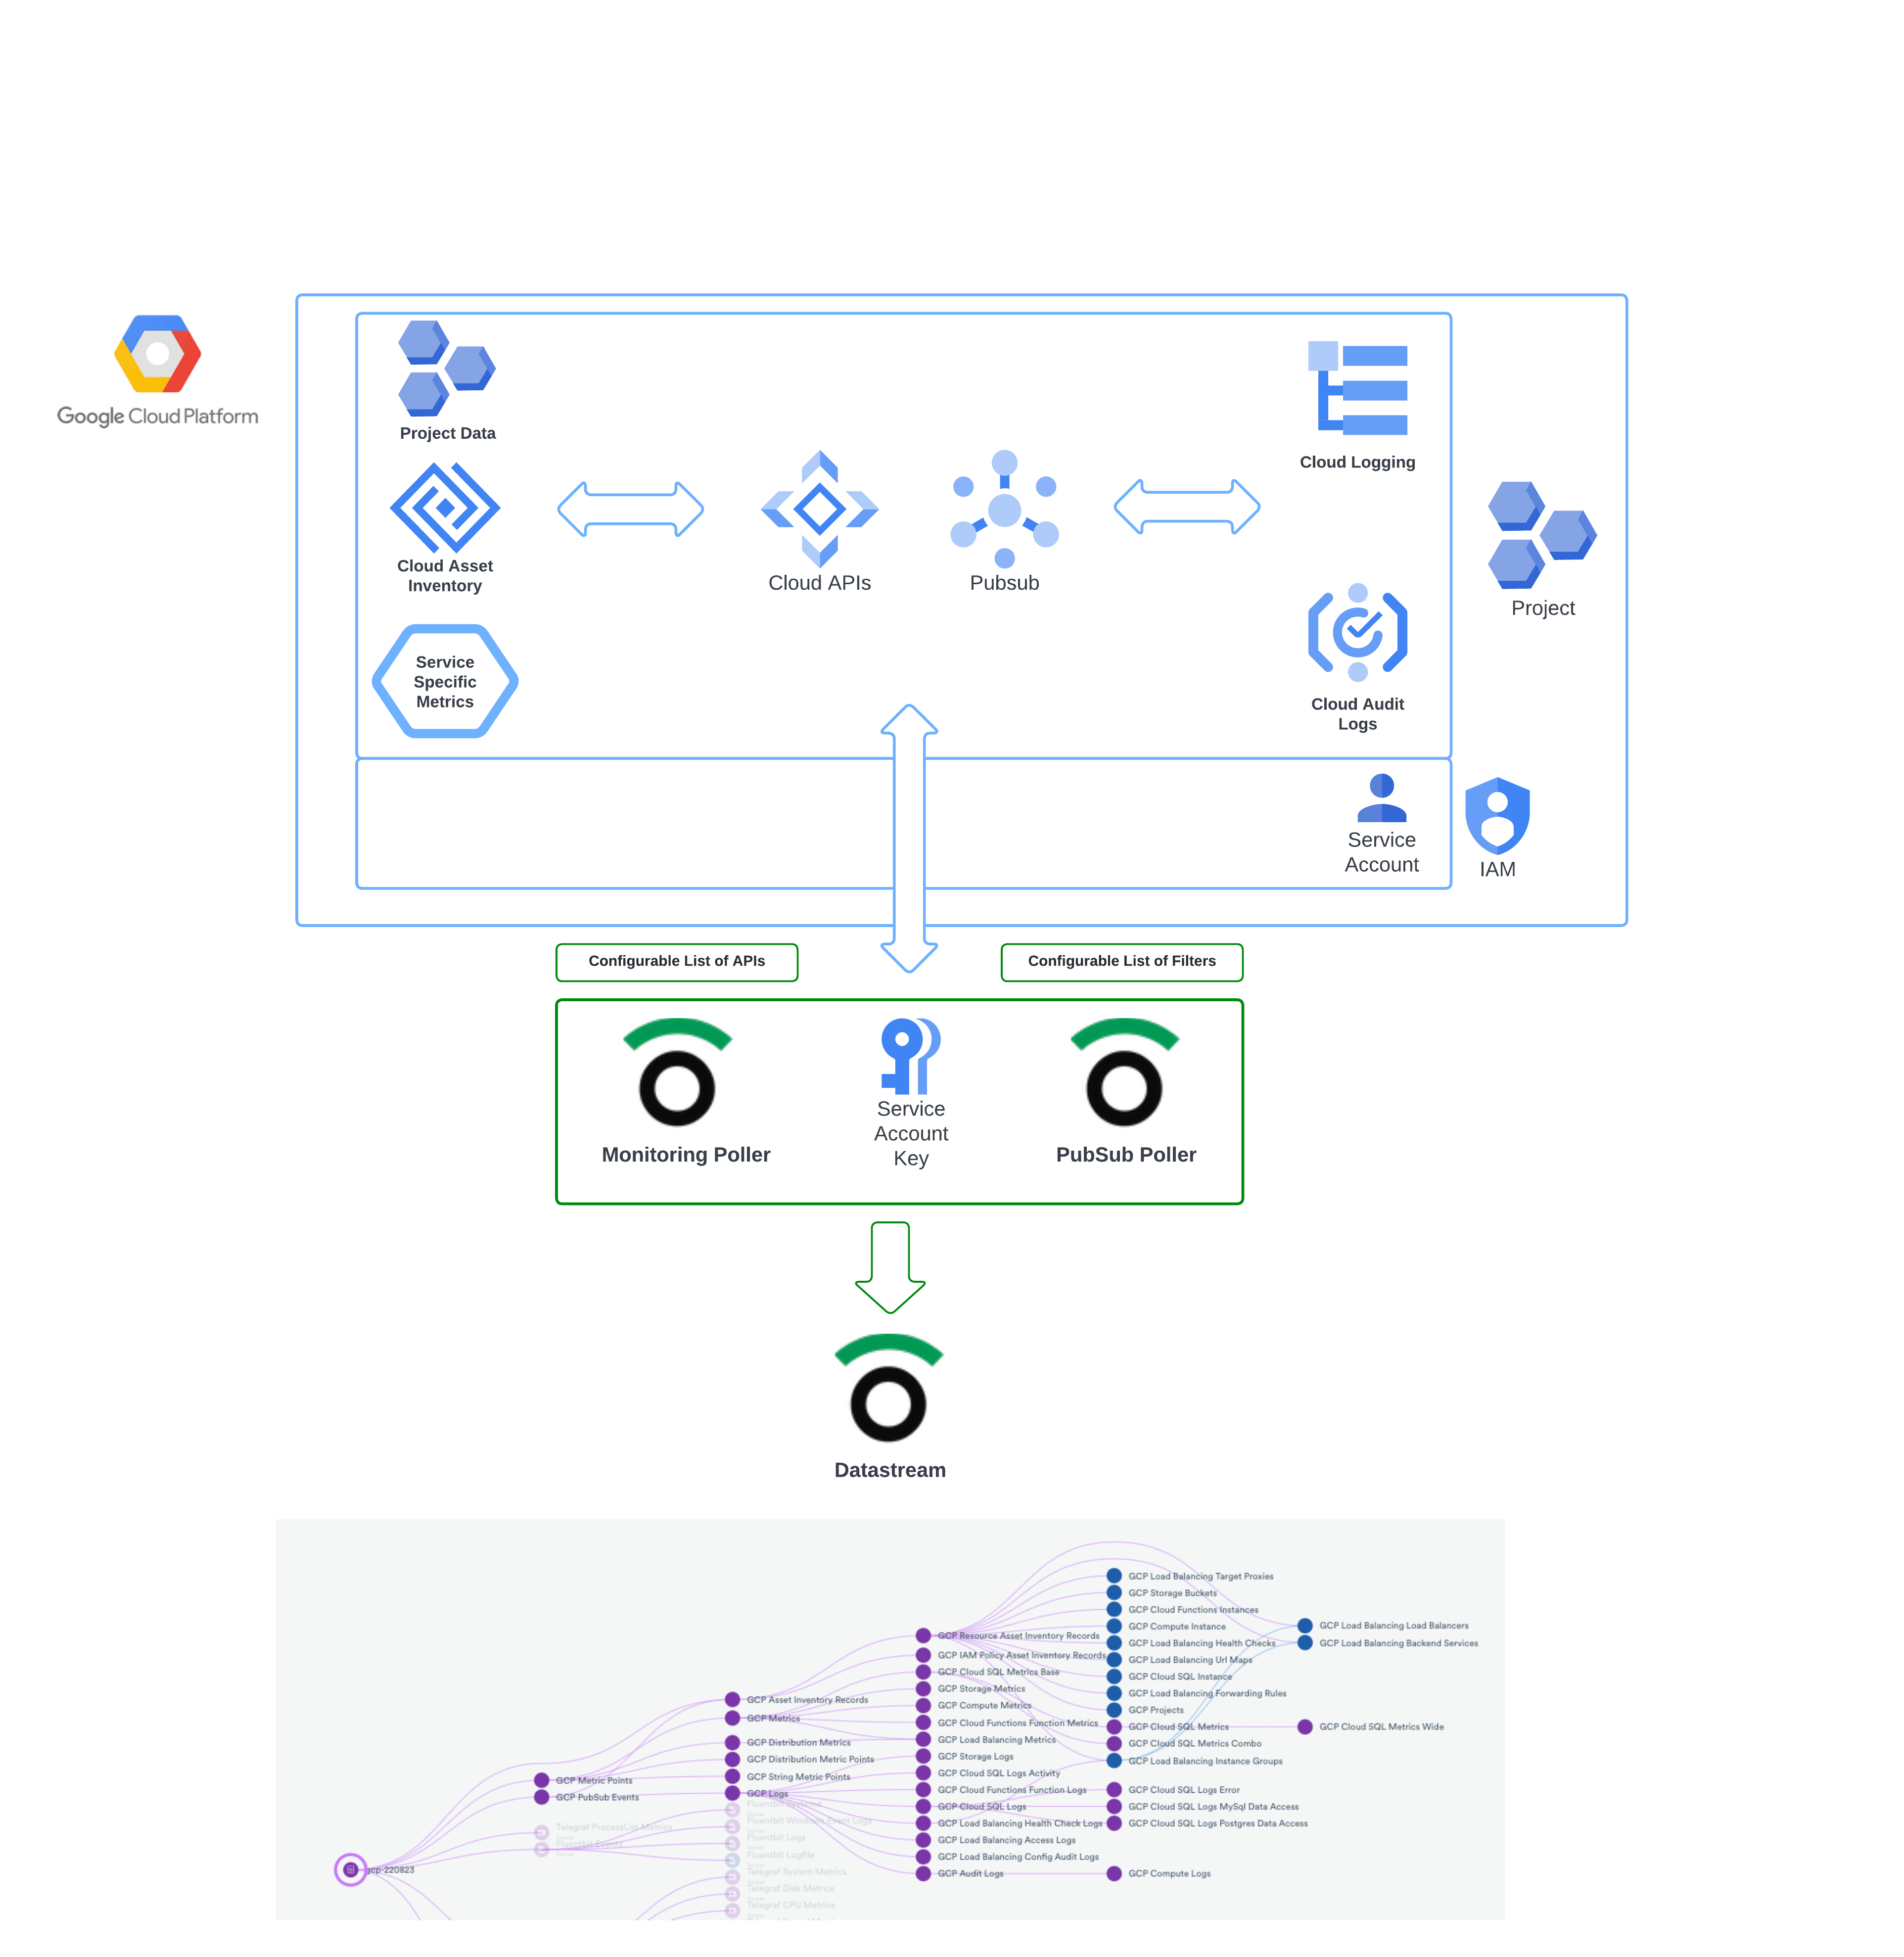
Figure 1 - GCP Module Flow
The GCP app shapes and accelerates the data for monitoring and troubleshooting.
Installation
Prerequisites
Before proceeding with the GCP app install, ensure you configure your GCP project using either Terraform or the GCP console.
Terraform automates the installation of the required service accounts with assigned IAM roles, Log Sinks, and Pub/Sub topics, as well as the subscription needed by the GCP application. When you finish, you need the service account key, which can be exported by the Terraform module and used by both the Monitoring and Pub/Sub pollers.
Here are the steps for using Terraform:
Install Terraform if needed.
Note
For power users, steps 2-5 below can alternatively be performed by running each of the following Terraform example modules.
Ensure you have logged into gcloud and have set your quota and working project (Steps 7-9) before running terraform!
Terraform Reference
Within the GCP Console search for and enable the following APIs:
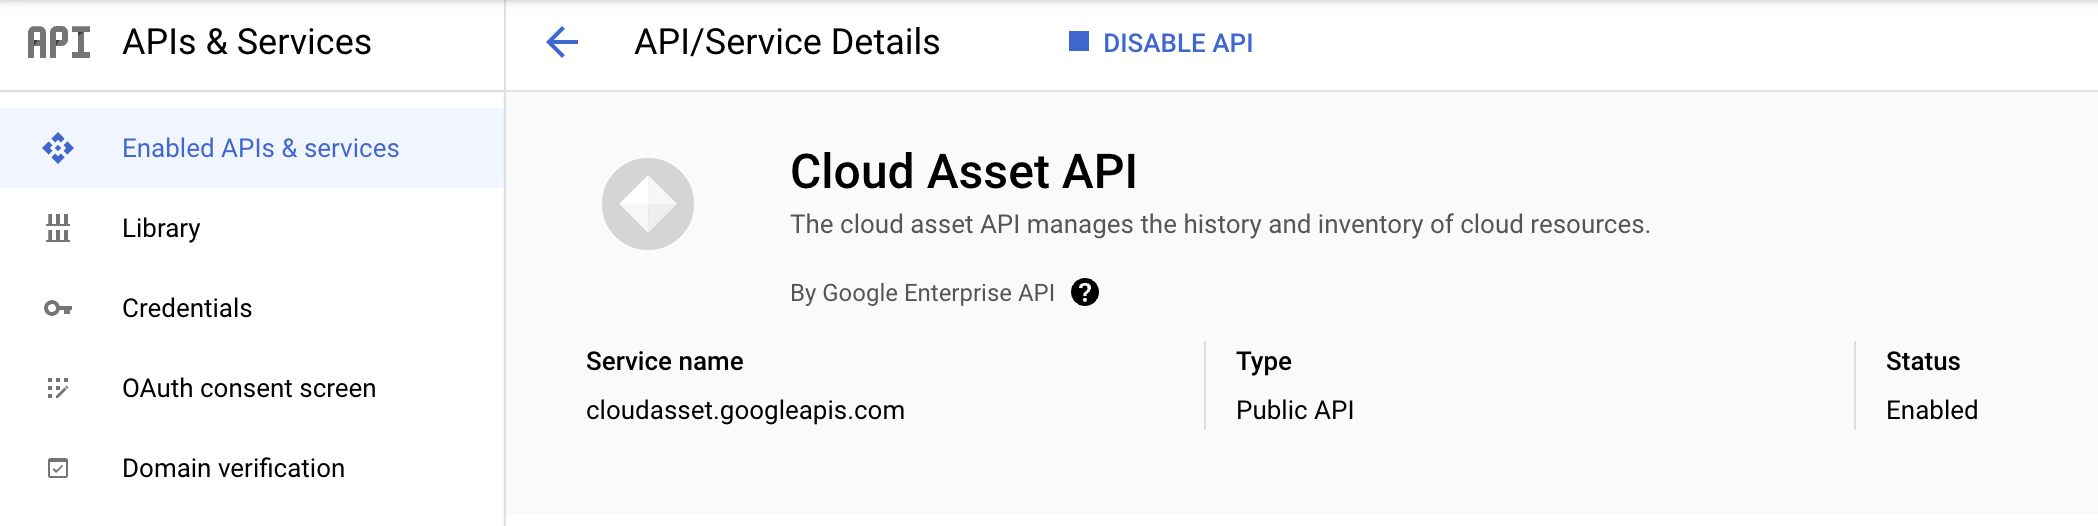
Figure 2 - API Setup for GCP integrations into Observe
3. Create a service account with the following roles:
To monitor a folder and all of the projects in the folder:
Role |
Purpose |
Terraform Programmatic Name |
|---|---|---|
Browser |
Read access to browse the hierarchy for a project, including the folder, organization, and allow policy. This role doesn’t include permission to view resources in the project. |
roles/browser |
Cloud Asset Owner |
Provides Observe’s Cloud Function to properly use export asset API, providing Observe with all GCP assets |
roles/cloudasset.owner |
Cloud Scheduler Admin |
Get and list access to jobs, executions, and locations. |
roles/cloudscheduler.admin |
Cloud Tasks Queue Admin |
To create and manage tasks for collection |
roles/cloudtasks.queueAdmin |
Folder Admin |
Provides all available permissions for working with folders. In particular, listing projects and updating projects. |
roles/resourcemanager.folderAdmin |
Logging Admin |
This provides the user ability to create an aggregated sink |
roles/logging.admin |
Monitoring Admin |
Allows a user to add projects to metric scope of the service/collection project |
roles/monitoring.admin |
Project Creator |
Ensures the user’s ability to create a new Project (if a new service/collection project is needed) |
roles/resourcemanager.projectCreator |
Project Deleter |
Ensures user’s ability to remove a Project |
roles/resourcemanager.projectDeleter |
Project Mover |
If you plan on moving Projects from one folder to another |
roles/resourcemanager.projectMover |
Service Management Administrator |
Full control of Google Service Management resources. |
roles/servicemanagement.admin |
Service Usage Admin |
Allows user to view services currently deployed and provide user the ability to enable and disable services. Used when deploying GCP Infrastructure and enabling metrics services when deploying Observe Collection at the Folder Level |
roles/serviceusage.serviceUsageAdmin |
Cloud Functions Admin |
Need to manage our collection function |
roles/cloudfunctions.admin |
Pub/Sub Admin |
To manage pub/sub topic for collection |
roles/pubsub.admin |
Service Account Token Creator |
For creating collection service account token |
roles/iam.serviceAccountTokenCreator |
Service Usage Consumer |
Reading enabled APIs |
roles/serviceusage.serviceUsageConsumer |
Delete Service Accounts |
Needed for destroying |
roles/iam.serviceAccountDeleter |
Create Service Accounts |
Create service account for collection |
roles/iam.serviceAccountCreator |
Service Account Key Admin |
Create and manage (and rotate) service account keys. |
roles/iam.serviceAccountKeyAdmin |
Storage Admin |
To create storage bucket |
roles/storage.admin |
Service Account User |
To impersonate function user |
roles/iam.serviceAccountUser |
To monitor a single project:
Role |
Purpose |
Terraform Programmatic Name |
|---|---|---|
Browser |
Read access to browse the hierarchy for a project, including the folder, organization, and allow policy. This role doesn’t include permission to view resources in the project. |
roles/browser |
Cloud Asset Owner |
Provides Observe’s Cloud Function to properly use export asset API, providing Observe with all GCP assets |
roles/cloudasset.owner |
Cloud Scheduler Admin |
Get and list access to jobs, executions, and locations. |
roles/cloudscheduler.admin |
Cloud Tasks Queue Admin |
To create and manage tasks for collection |
roles/cloudtasks.queueAdmin |
Logging Admin |
This provides the user ability to create an aggregated sink |
roles/logging.admin |
Monitoring Admin |
Allows a user to add projects to metric scope of the service/collection project |
roles/monitoring.admin |
Service Management Administrator |
Full control of Google Service Management resources. |
roles/servicemanagement.admin |
Service Usage Admin |
Allows user to view services currently deployed and provide user the ability to enable and disable services. Used when deploying GCP Infrastructure and enabling metrics services when deploying Observe Collection at the Folder Level |
roles/serviceusage.serviceUsageAdmin |
Cloud Functions Admin |
Need to manage our collection function |
roles/cloudfunctions.admin |
Pub/Sub Admin |
To manage pub/sub topic for collection |
roles/pubsub.admin |
Service Account Token Creator |
For creating collection service account token |
roles/iam.serviceAccountTokenCreator |
Service Usage Consumer |
Reading enabled APIs |
roles/serviceusage.serviceUsageConsumer |
Delete Service Accounts |
Needed for destroying |
roles/iam.serviceAccountDeleter |
Create Service Accounts |
Create service account for collection |
roles/iam.serviceAccountCreator |
Service Account Key Admin |
Create and manage (and rotate) service account keys. |
roles/iam.serviceAccountKeyAdmin |
Storage Admin |
To create storage bucket |
roles/storage.admin |
Service Account User |
To impersonate function user |
roles/iam.serviceAccountUser |
Project IAM Admin |
To assign permissions to function service accounts |
roles/resourcemanager.projectIamAdmin |
Note
The service account used here is required to run the terraform and create the collection which requires broad permissions. The service account running the collection does not have these permissions.
4. Add yourself under “Service account users role” for the service account.
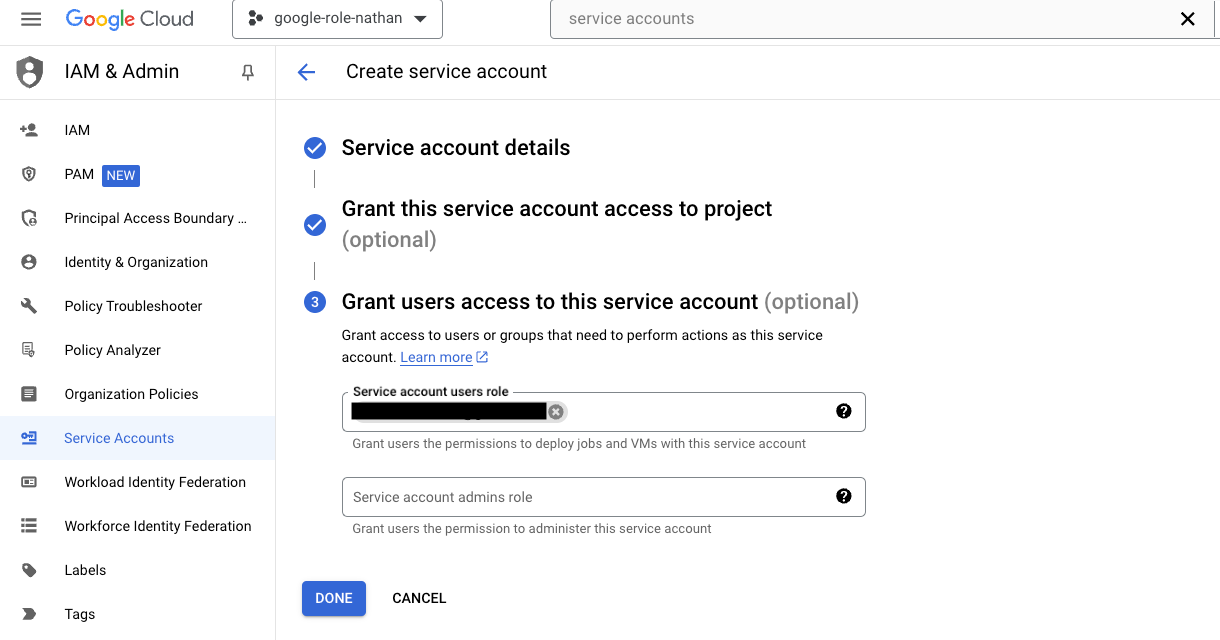
5. Add Service Account Token Creator to your principal
6. Create a Terraform module. The following Terraform snippets install the GCP collection stack for the project of the Google provider.
Observe currently supports two methods for deploying the Observe GCP collection. You can choose to install the collection for a single project, or for multi-project environments, you deploy the collection to a folder and Observe collects for each project inside of that folder.
Single Project
    provider "google" {
      project = "YOUR_PROJECT_ID"
      region  = "YOUR_DEFAULT_REGION"
    }

    module "observe_gcp_collection" {
      source   = "observeinc/collection/google"
      name     = "dev"
      resource = "projects/YOUR_PROJECT_ID"
      project_id  = "YOUR_PROJECT_ID"
    }

    output "subscription" {
      description = "The Pub/Sub subscription created by this module."
      value       = module.observe_gcp_collection.subscription
    }

    output "service_account_private_key" {
      description = "A service account key sent to the pollers for Pub/Sub and Cloud Monitoring"
      value       = base64decode(module.observe_gcp_collection.service_account_key.private_key)
      sensitive   = true
    }
Folder Collection
    provider "google" {
      project = "YOUR_PROJECT_ID"
      region  = "YOUR_DEFAULT_REGION"
    }

    module "observe_gcp_collection" {
      source   = "observeinc/collection/google"
      name     = "dev"
      resource = "folders/YOUR_FOlDER_ID"
      project_id  = "YOUR_PROJECT_ID" # this is scoping project set in step 8.
    }

    output "subscription" {
      description = "The Pub/Sub subscription created by this module."
      value       = module.observe_gcp_collection.subscription
    }

    output "service_account_private_key" {
      description = "A service account key sent to the pollers for Pub/Sub and Cloud Monitoring"
      value       = base64decode(module.observe_gcp_collection.service_account_key.private_key)
      sensitive   = true
    }
Note
If you choose folder collection, the project you set becomes your metrics scoping project. All other projects in your folder report their metrics through this project with no added GCP charges. If you add projects to the folder, you must run terraform again to add the new projects into the metrics monitoring scope.
7. Set up the Google Cloud SDK and run gcloud auth application-default login to create a credentials file for Terraform to use.
gcloud auth application-default login
8. Set your quota project. This is the project that will be used for billing and project quotas.
gcloud auth application-default set-quota-project <MYQUOTAPROJECT>
9. Set your working project. If you are installing collection for a folder, this is the project you want to be used as the scoping project.
gcloud config set project <MYPROJECT>
10. Run export GOOGLE_IMPERSONATE_SERVICE_ACCOUNT=some-sa@scoping-project-392418.iam.gserviceaccount.com. This runs the terraform as the service account you created in Step 4. A service account is required to create the asset feed, and it cannot be done by a user.
export GOOGLE_IMPERSONATE_SERVICE_ACCOUNT=some-sa@scoping-project-392418.iam.gserviceaccount.com
Note
If the service account was created via Create Service Account, service account email can be accessed via terraform output as terraform-observe-collect-sa@<your-project-id>.iam.gserviceaccount.com
11. Run terraform apply.
terraform apply
12. Record information needed for installation of the GCP App.
To access the service account key after running Terraform, use theterraform output -raw service_account_private_key
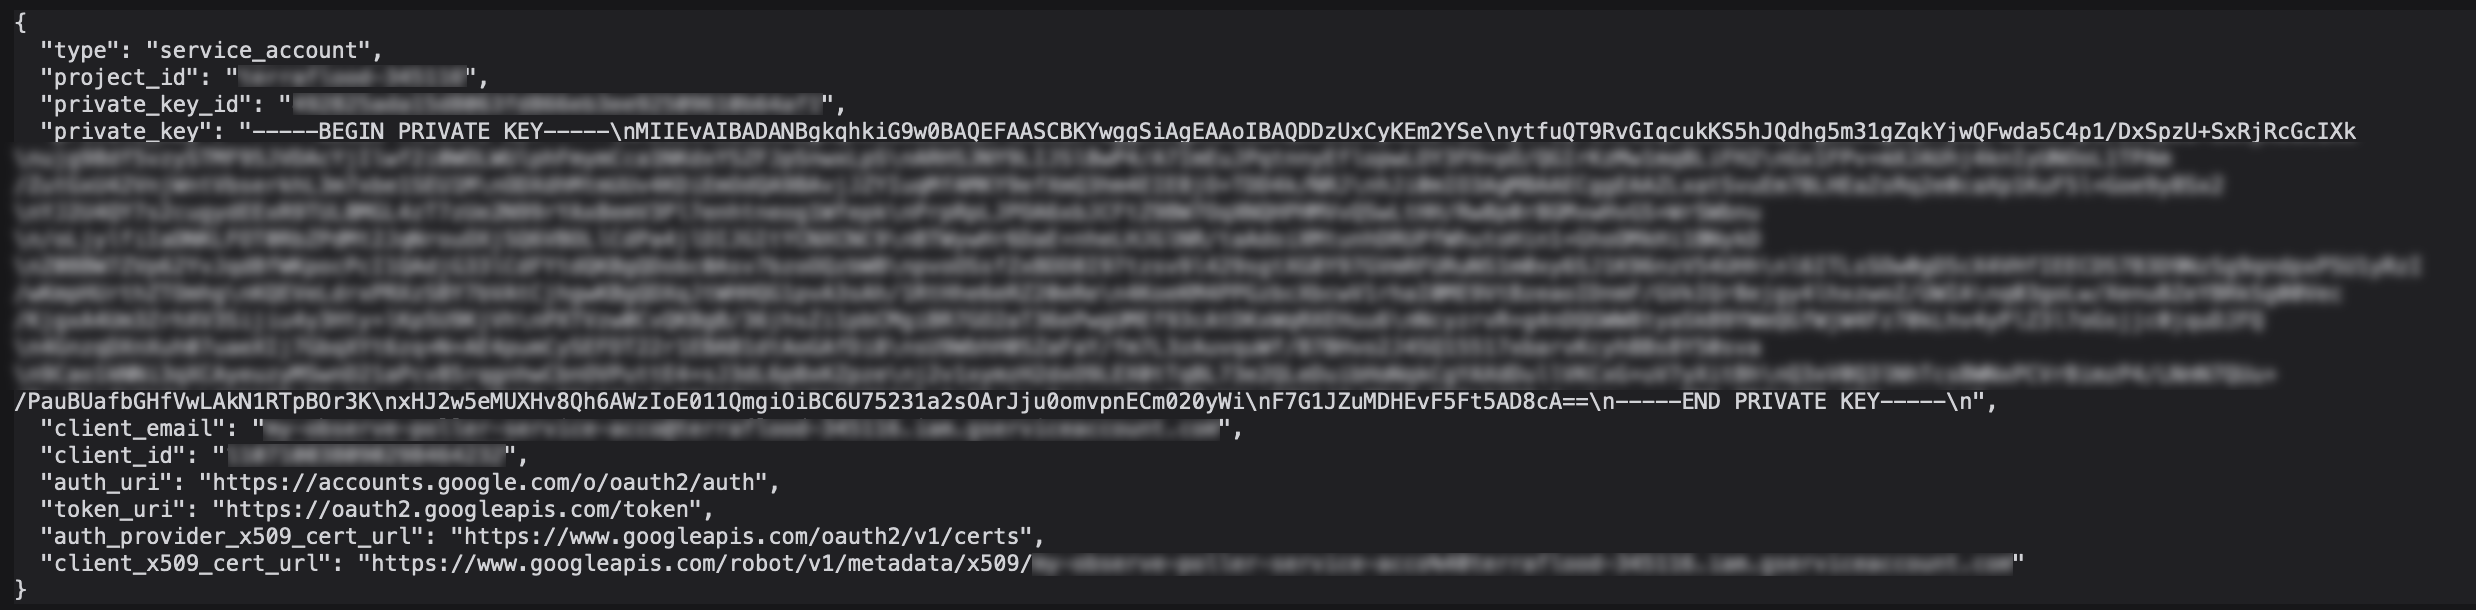
Figure 3 - JSON key for GCP integrations into Observe
Also, make a note of the created subscription name. You need this for the GCP App installation.
terraform output subscription
In this case, capture the name property of the output.
"name" = "dev-obs"
Record the dev-obs portion for the later GCP App installation.
Once you create these resources, you can proceed with your GCP App configuration.
Most commonly, you use the Observe Apps install page to install and configure the GCP App. However, Observe can also provide the Terraform modules and providers necessary for this task. Please contact your Observe account manager for assistance.
Within the GCP Console (or gcloud cli), you need to perform the following tasks:
Create service accounts with properly assigned IAM roles
Create a Pub/Sub topic and subscription needed to poll a project’s data
1. Create a Service account with the following details:
- Service account name: my-observe-poller-service-account
- Service account ID: my-observe-poller-service-id
- Service account description: My Observe Pollers
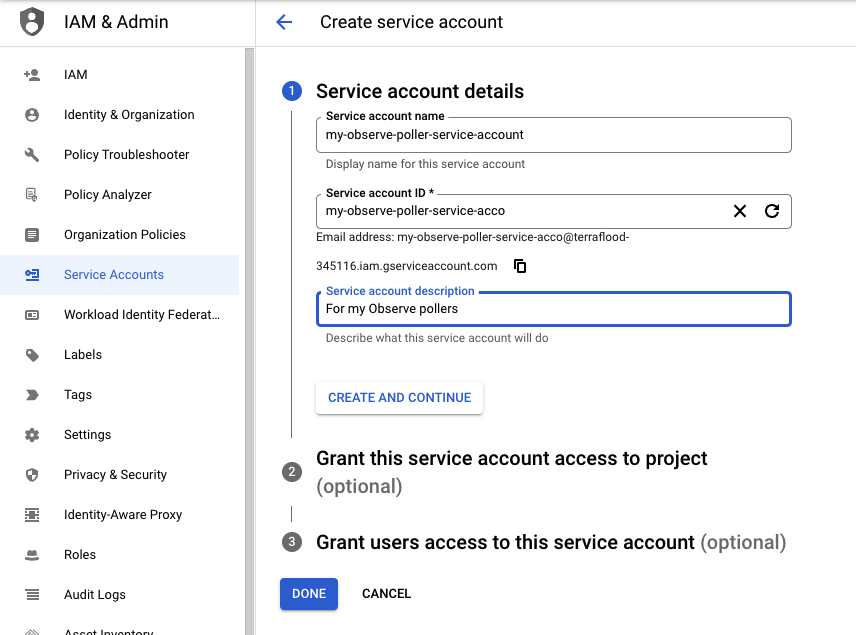
Figure 6 - Service Account setup for GCP integrations for Observe
2. Grant this service account access to the project:
Role: Monitoring Viewer (roles/monitoring.viewer)
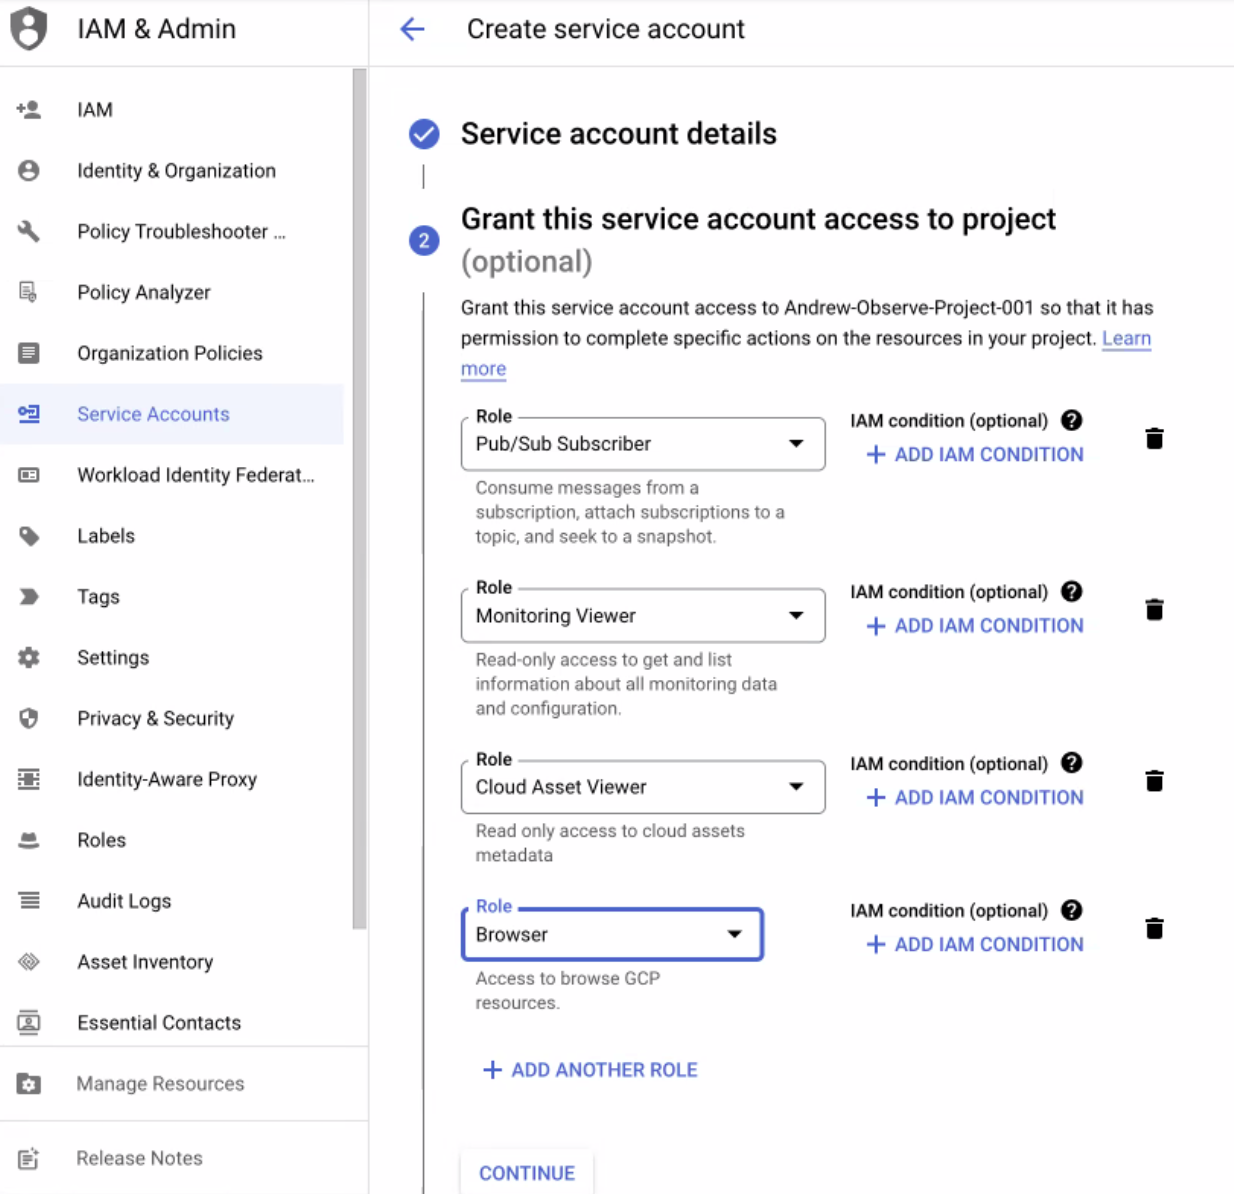
Figure 7 - Service Account Roles for GCP integrations with Observe
3. Generate and download a Service account key for the Service account you just created:
- Click on the KEYS tab.
- Click ADD KEY.
- Select the Key type as JSON.
- Click Create.
4. Save the key for the Observe GCP App Installation.
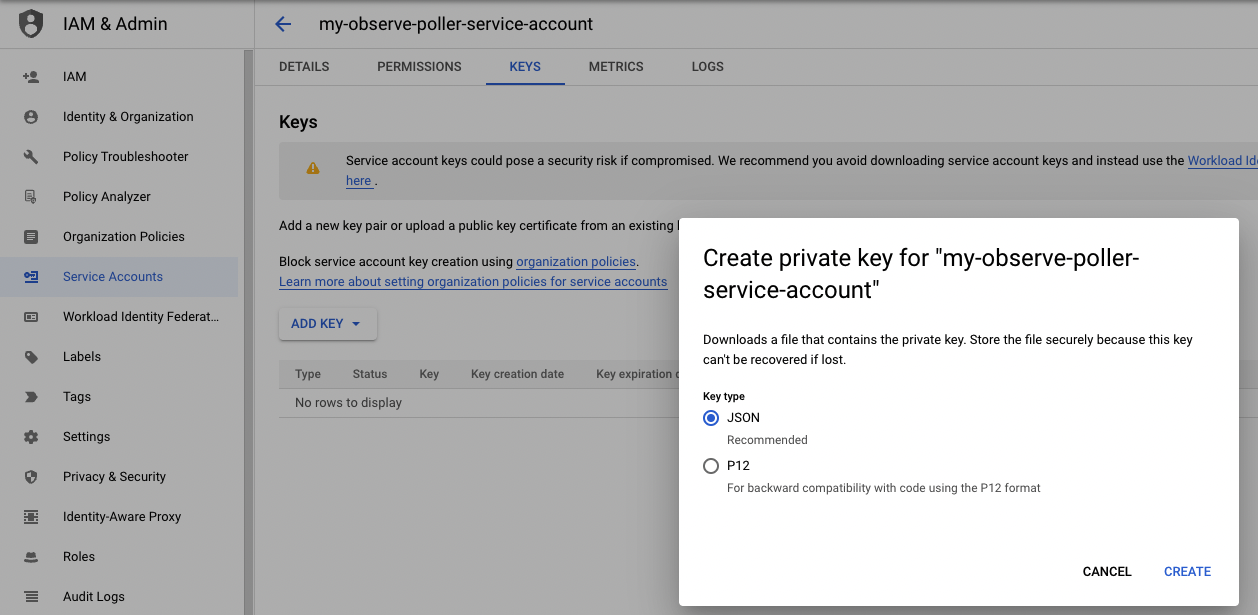
Figure 8 - Service Account Key setup for GCP integrations for Observe
Figure 9 - Service Account Key setup for GCP integrations for Observe
Under Topics, click Create a topic.
Configure the following parameters:
- Enter the Topic ID observe-topic.
- Select Add a default subscription.
- Under Encryption select Google-managed encryption key.
3. Click CREATE TOPIC.
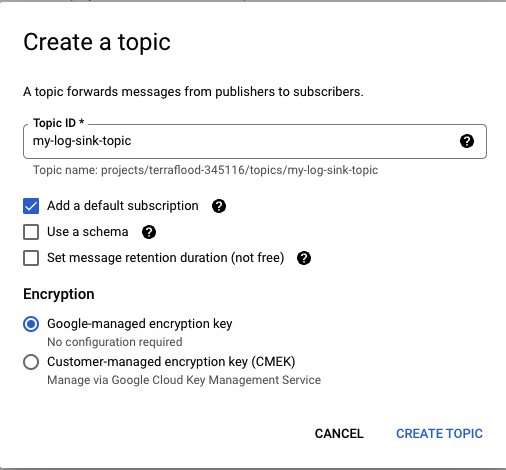
Figure 10 - Service Account Key setup for GCP integrations for Observe
On the Subscriptions tab, you see that GCP automatically created a Pub/Sub subscription. You need this information for GCP App setup.
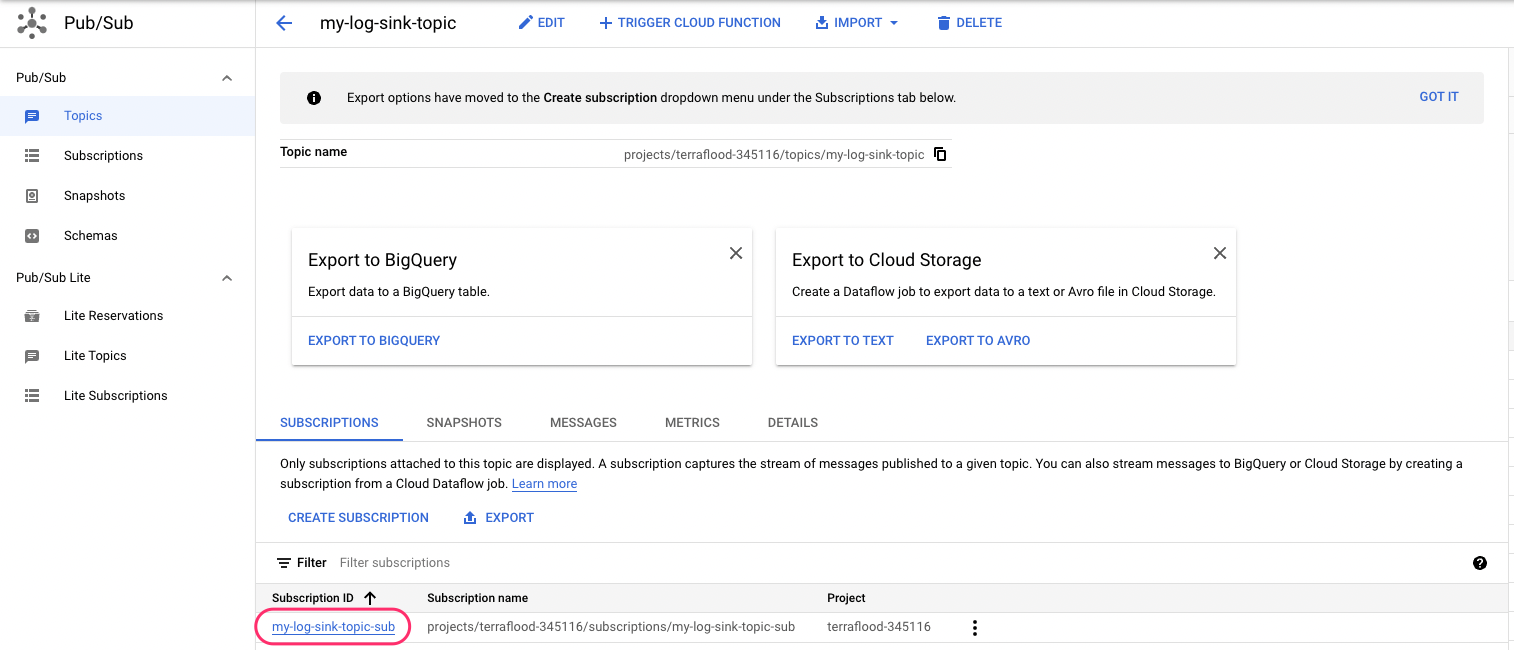
Figure 11 - Pub/Sub topic setup for GCP integrations for Observe
Configure a Log Sink to publish to the Pub/Sub topic.
Under Logs Router, click Create sink.
2. Under Sink details, add the following information:
- Enter my-observe-log-sink as the Sink name.
- Enter For my Observe pubsub topic for the Sink description.
- Select Sink Service Cloud Pub/Sub topic.
- Choose the topic under your project that ends with your Sink name. Based on the previous step, use observe-topic.
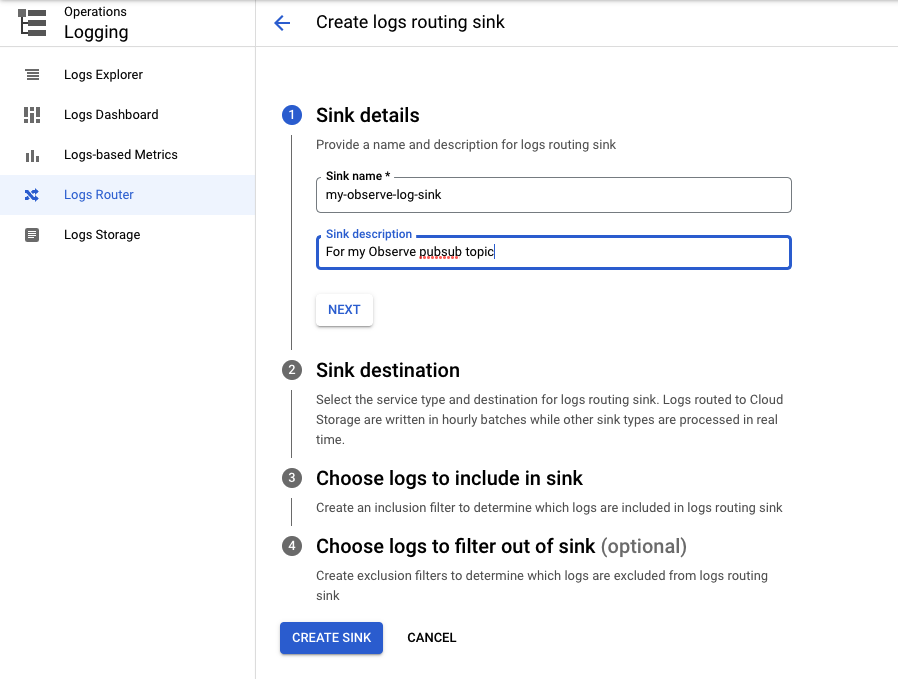
Figure 12 - Log Sink setup for GCP integrations with Observe
3. Under the Sink destination, configure the following parameters:
4. Click CREATE SINK.
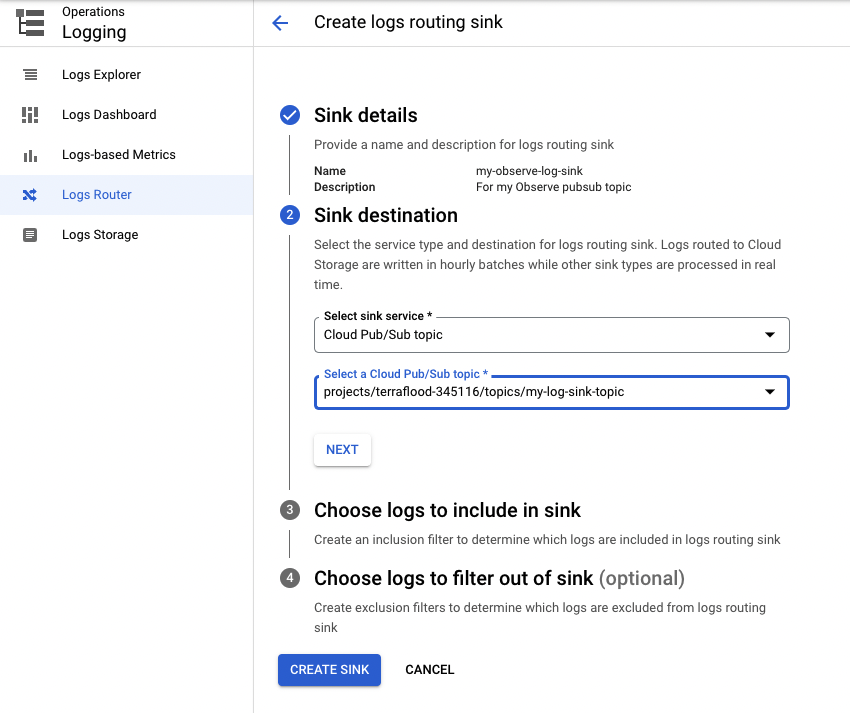
Figure 13 - Log Sink topic setup for GCP integrations for Observe
5. Create an inclusion filter to determine which logs you want to include in the Sink.
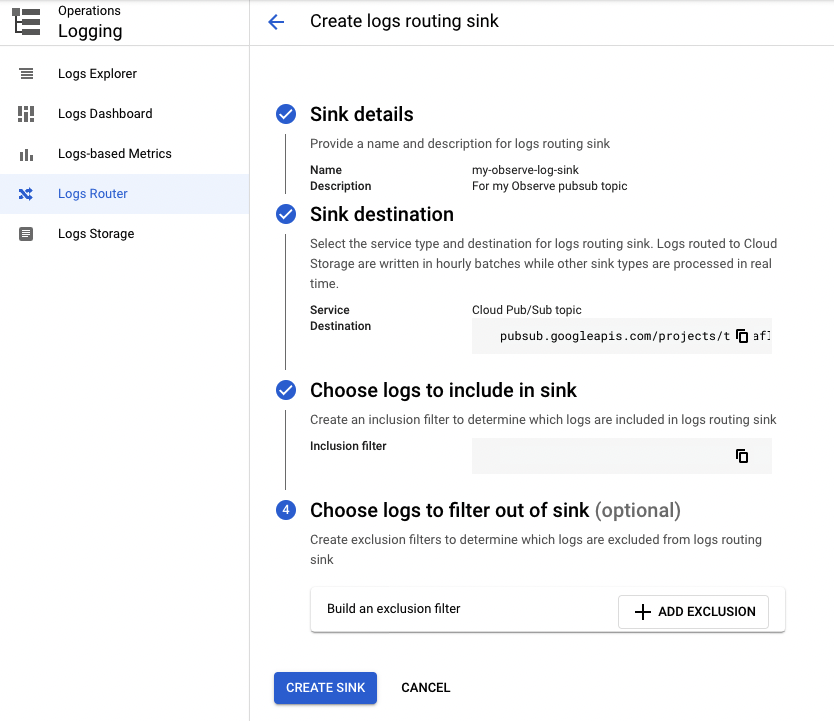
Figure 14 - Log Sink filters for GCP integrations for Observe
6. Click Create Sink.
gcloud asset feeds create my-asset-updates \
    --project=my-project \
    --asset-types='aiplatform.googleapis.com.*,anthos.googleapis.com.*,apigateway.googleapis.com.*,apikeys.googleapis.com.*,appengine.googleapis.com.*,apps.k8s.io.*,artifactregistry.googleapis.com.*,assuredworkloads.googleapis.com.*,batch.k8s.io.*,beyondcorp.googleapis.com.*,bigquery.googleapis.com.*,bigquerymigration.googleapis.com.*,bigtableadmin.googleapis.com.*,cloudbilling.googleapis.com.*,clouddeploy.googleapis.com.*,cloudfunctions.googleapis.com.*,cloudkms.googleapis.com.*,cloudresourcemanager.googleapis.com.*,composer.googleapis.com.*,compute.googleapis.com.*,connectors.googleapis.com.*,container.googleapis.com.*,containerregistry.googleapis.com.*,dataflow.googleapis.com.*,dataform.googleapis.com.*,datafusion.googleapis.com.*,datamigration.googleapis.com.*,dataplex.googleapis.com.*,dataproc.googleapis.com.*,datastream.googleapis.com.*,dialogflow.googleapis.com.*,dlp.googleapis.com.*,dns.googleapis.com.*,documentai.googleapis.com.*,domains.googleapis.com.*,eventarc.googleapis.com.*,extensions.k8s.io.*,file.googleapis.com.*,firestore.googleapis.com.*,gameservices.googleapis.com.*,gkebackup.googleapis.com.*,gkehub.googleapis.com.*,healthcare.googleapis.com.*,iam.googleapis.com.*,ids.googleapis.com.*,k8s.io.*,logging.googleapis.com.*,managedidentities.googleapis.com.*,memcache.googleapis.com.*,metastore.googleapis.com.*,monitoring.googleapis.com.*,networkconnectivity.googleapis.com.*,networking.k8s.io.*,networkmanagement.googleapis.com.*,networkservices.googleapis.com.*,orgpolicy.googleapis.com.*,osconfig.googleapis.com.*,privateca.googleapis.com.*,pubsub.googleapis.com.*,rbac.authorization.k8s.io.*,redis.googleapis.com.*,run.googleapis.com.*,secretmanager.googleapis.com.*,servicedirectory.googleapis.com.*,servicemanagement.googleapis.com.*,serviceusage.googleapis.com.*,spanner.googleapis.com.*,speech.googleapis.com.*,sqladmin.googleapis.com.*,storage.googleapis.com.*,tpu.googleapis.com.*,transcoder.googleapis.com.*,vpcaccess.googleapis.com.*,workflows.googleapis.com.*' \
    --content-type=resource \
    --pubsub-topic=projects/my-project/topics/observe-topic
Perform the following tasks using the gcloud cli locally or using a GCP Console Cloud Shell:
1. Set Your Project and Region IDs as Environment Variables
export PROJECT_ID=<YOUR_PROJECT_ID>
export REGION_ID=<YOUR_REGION>
2. Create a Service Account for Cloud Functions:
gcloud iam service-accounts create observe-cloudfunctions --description="Used by the Observe Cloud Functions" --display-name="observe-cloudfunctions"
3. Assign Roles to the Cloud Function Service Account:
gcloud projects add-iam-policy-binding ${PROJECT_ID} --member=serviceAccount:observe-cloudfunctions@${PROJECT_ID}.iam.gserviceaccount.com --role=roles/compute.viewer
gcloud projects add-iam-policy-binding ${PROJECT_ID} --member=serviceAccount:observe-cloudfunctions@${PROJECT_ID}.iam.gserviceaccount.com --role=roles/iam.serviceAccountViewer
gcloud projects add-iam-policy-binding ${PROJECT_ID} --member=serviceAccount:observe-cloudfunctions@${PROJECT_ID}.iam.gserviceaccount.com --role=roles/cloudscheduler.viewer
gcloud projects add-iam-policy-binding ${PROJECT_ID} --member=serviceAccount:observe-cloudfunctions@${PROJECT_ID}.iam.gserviceaccount.com --role=roles/cloudasset.viewer
gcloud projects add-iam-policy-binding ${PROJECT_ID} --member=serviceAccount:observe-cloudfunctions@${PROJECT_ID}.iam.gserviceaccount.com --role=roles/browser
gcloud projects add-iam-policy-binding ${PROJECT_ID} --member=serviceAccount:observe-cloudfunctions@${PROJECT_ID}.iam.gserviceaccount.com --role=roles/logging.viewer
gcloud projects add-iam-policy-binding ${PROJECT_ID} --member=serviceAccount:observe-cloudfunctions@${PROJECT_ID}.iam.gserviceaccount.com --role=roles/monitoring.viewer
gcloud projects add-iam-policy-binding ${PROJECT_ID} --member=serviceAccount:observe-cloudfunctions@${PROJECT_ID}.iam.gserviceaccount.com --role=roles/storage.objectCreator
gcloud projects add-iam-policy-binding ${PROJECT_ID} --member=serviceAccount:observe-cloudfunctions@${PROJECT_ID}.iam.gserviceaccount.com --role=roles/storage.objectViewer
gcloud projects add-iam-policy-binding ${PROJECT_ID} --member=serviceAccount:observe-cloudfunctions@${PROJECT_ID}.iam.gserviceaccount.com --role=roles/storage.objectAdmin
gcloud projects add-iam-policy-binding ${PROJECT_ID} --member=serviceAccount:observe-cloudfunctions@${PROJECT_ID}.iam.gserviceaccount.com --role=roles/storage.admin
gcloud projects add-iam-policy-binding ${PROJECT_ID} --member=serviceAccount:observe-cloudfunctions@${PROJECT_ID}.iam.gserviceaccount.com --role=roles/cloudfunctions.invoker
gcloud projects add-iam-policy-binding ${PROJECT_ID} --member=serviceAccount:observe-cloudfunctions@${PROJECT_ID}.iam.gserviceaccount.com --role=roles/cloudtasks.enqueuer
gcloud projects add-iam-policy-binding ${PROJECT_ID} --member=serviceAccount:observe-cloudfunctions@${PROJECT_ID}.iam.gserviceaccount.com --role=roles/cloudtasks.viewer
gcloud projects add-iam-policy-binding ${PROJECT_ID} --member=serviceAccount:observe-cloudfunctions@${PROJECT_ID}.iam.gserviceaccount.com --role=roles/cloudtasks.taskDeleter
gcloud projects add-iam-policy-binding ${PROJECT_ID} --member=serviceAccount:observe-cloudfunctions@${PROJECT_ID}.iam.gserviceaccount.com --role=roles/iam.serviceAccountUser
4. Create a Service Account for Cloud Scheduler:
gcloud iam service-accounts create observe-scheduler --description="Allows the Cloud Scheduler job to trigger a Cloud Function" --display-name="observe-scheduler"
5. Set Up a Storage Bucket:
gsutil mb -l US gs://${PROJECT_ID}-observe
gsutil iam ch serviceAccount:observe-cloudfunctions@${PROJECT_ID}.iam.gserviceaccount.com:objectCreator gs://${PROJECT_ID}-observe
gsutil iam ch serviceAccount:observe-cloudfunctions@${PROJECT_ID}.iam.gserviceaccount.com:objectViewer gs://${PROJECT_ID}-observe
6. Set Up a Task Queue:
gcloud tasks queues create --location=${REGION_ID} observe-assets-queue
7. Deploy the ‘observe_assets_to_gcs’ Cloud Function:
# Deploy observe_assets_to_gcs Cloud Function
gcloud functions deploy observe_assets_to_gcs \
--runtime=python310 \
--trigger-http \
--memory=512MB \
--allow-unauthenticated \
--service-account=observe-cloudfunctions@${PROJECT_ID}.iam.gserviceaccount.com \
--source=gs://observeinc/google-cloud-functions-v0.3.0.zip \
--entry-point=export_assets \
--set-env-vars=GCP_REGION=${REGION_ID},GCS_TO_PUBSUB_CLOUD_FUNCTION_URI=https://${REGION_ID}-${PROJECT_ID}.cloudfunctions.net/observe_gcs_to_pubsub,LOG_LEVEL=WARNING,OUTPUT_BUCKET=gs://${PROJECT_ID}-observe,PARENT=projects/${PROJECT_ID},PROJECT=${PROJECT_ID},SERVICE_ACCOUNT_EMAIL=observe-cloudfunctions@${PROJECT_ID}.iam.gserviceaccount.com,TASK_QUEUE=observe-assets-queue,TOPIC_ID=projects/${PROJECT_ID}/topics/observe-topic,VERSION=observeinc/google-cloud-functions-v0.3.0.zip \
--max-instances=100 \
--timeout=300s
8. Assign Roles to the Cloud Scheduler Service Account:
gcloud functions add-iam-policy-binding observe_assets_to_gcs --project=${PROJECT_ID} --member=serviceAccount:observe-scheduler@${PROJECT_ID}.iam.gserviceaccount.com --role=roles/cloudfunctions.invoker
9. Set Up the Cloud Scheduler:
gcloud scheduler jobs create http observe-assets-job \
--schedule="0 * * * *" \
--http-method=POST \
--uri=https://${REGION_ID}-${PROJECT_ID}.cloudfunctions.net/observe_assets_to_gcs \
--oidc-service-account-email=observe-scheduler@${PROJECT_ID}.iam.gserviceaccount.com \
--message-body='{}' \
--headers=Content-Type=application/json \
--location=${REGION_ID}
10. Deploy the ‘observe_gcs_to_pubsub’ Cloud Function:
gcloud functions deploy observe_gcs_to_pubsub \
--runtime=python310 \
--trigger-http \
--memory=512MB \
--allow-unauthenticated \
--service-account=observe-cloudfunctions@${PROJECT_ID}.iam.gserviceaccount.com \
--source=gs://observeinc/google-cloud-functions-v0.3.0.zip \
--entry-point=gcs_to_pubsub \
--set-env-vars=GCP_REGION=${REGION_ID},GCS_TO_PUBSUB_CLOUD_FUNCTION_URI=not_applicable,LOG_LEVEL=WARNING,OUTPUT_BUCKET=gs://${PROJECT_ID}-observe,PARENT=projects/${PROJECT_ID},PROJECT=${PROJECT_ID},SERVICE_ACCOUNT_EMAIL=observe-cloudfunctions@${PROJECT_ID}.iam.gserviceaccount.com,TASK_QUEUE=observe-assets-queue,TOPIC_ID=projects/${PROJECT_ID}/topics/observe-topic,VERSION=observeinc/google-cloud-functions-v0.3.0.zip \
--max-instances=100 \
--timeout=300s
11. Set Service Account Permissions for Pub/Sub:
gcloud pubsub topics add-iam-policy-binding observe \
  --member=serviceAccount:observe-cloudfunctions@${PROJECT_ID}.iam.gserviceaccount.com \
  --role=roles/pubsub.publisher \
  --project=${PROJECT_ID}
12. Deploy the ‘observe_rest_of_assets’ Cloud Function:
gcloud functions deploy observe_rest_of_assets \
--runtime=python310 \
--trigger-http \
--memory=512MB \
--allow-unauthenticated \
--service-account=observe-cloudfunctions@${PROJECT_ID}.iam.gserviceaccount.com \
--source=gs://observeinc/google-cloud-functions-v0.3.0.zip \
--entry-point=rest_of_assets \
--set-env-vars=GCP_REGION=${REGION_ID},GCS_TO_PUBSUB_CLOUD_FUNCTION_URI=not_applicable,LOG_LEVEL=WARNING,OUTPUT_BUCKET=gs://${PROJECT_ID}-observe,PARENT=projects/${PROJECT_ID},PROJECT=${PROJECT_ID},SERVICE_ACCOUNT_EMAIL=observe-cloudfunctions@${PROJECT_ID}.iam.gserviceaccount.com,TASK_QUEUE=observe-assets-queue,TOPIC_ID=projects/${PROJECT_ID}/topics/observe-topic,VERSION=observeinc/google-cloud-functions-v0.3.0.zip \
--max-instances=100 \
--timeout=300s
13. Schedule the ‘observe_rest_of_assets’ Cloud Function:
gcloud scheduler jobs create http observe-rest-assets-job \
--schedule="15 * * * *" \
--http-method=POST \
--uri=https://${REGION_ID}-${PROJECT_ID}.cloudfunctions.net/observe_rest_of_assets \
--oidc-service-account-email=observe-scheduler@${PROJECT_ID}.iam.gserviceaccount.com \
--message-body='{}' \
--headers=Content-Type=application/json \
--location=${REGION_ID}
Within the GCP Console, search for and enable the following APIs:
Baseline
Service-specific
Figure 21 - API Setup for GCP integrations for Observe
After you create the resources and enable the APIs, you can proceed with the GCP App configuration.
GCP App
Note
Although Observe allows you to control the amount of data consumed from GCP, the consumption of assets, logs, and metrics does incur costs. See Google Cloud’s Operations Suite Pricing for more information.
To proceed with the GCP app install, you must enter the Service Account private key associated with a GCP service account created in Prerequisites.
As a reminder - the service account must have the following permissions:
Role: Pub/Sub Subscriber (roles/pubsub.subscriber)
Role: Monitoring Viewer (roles/monitoring.viewer)
Installation
Navigate to the Apps configuration page in Observe.
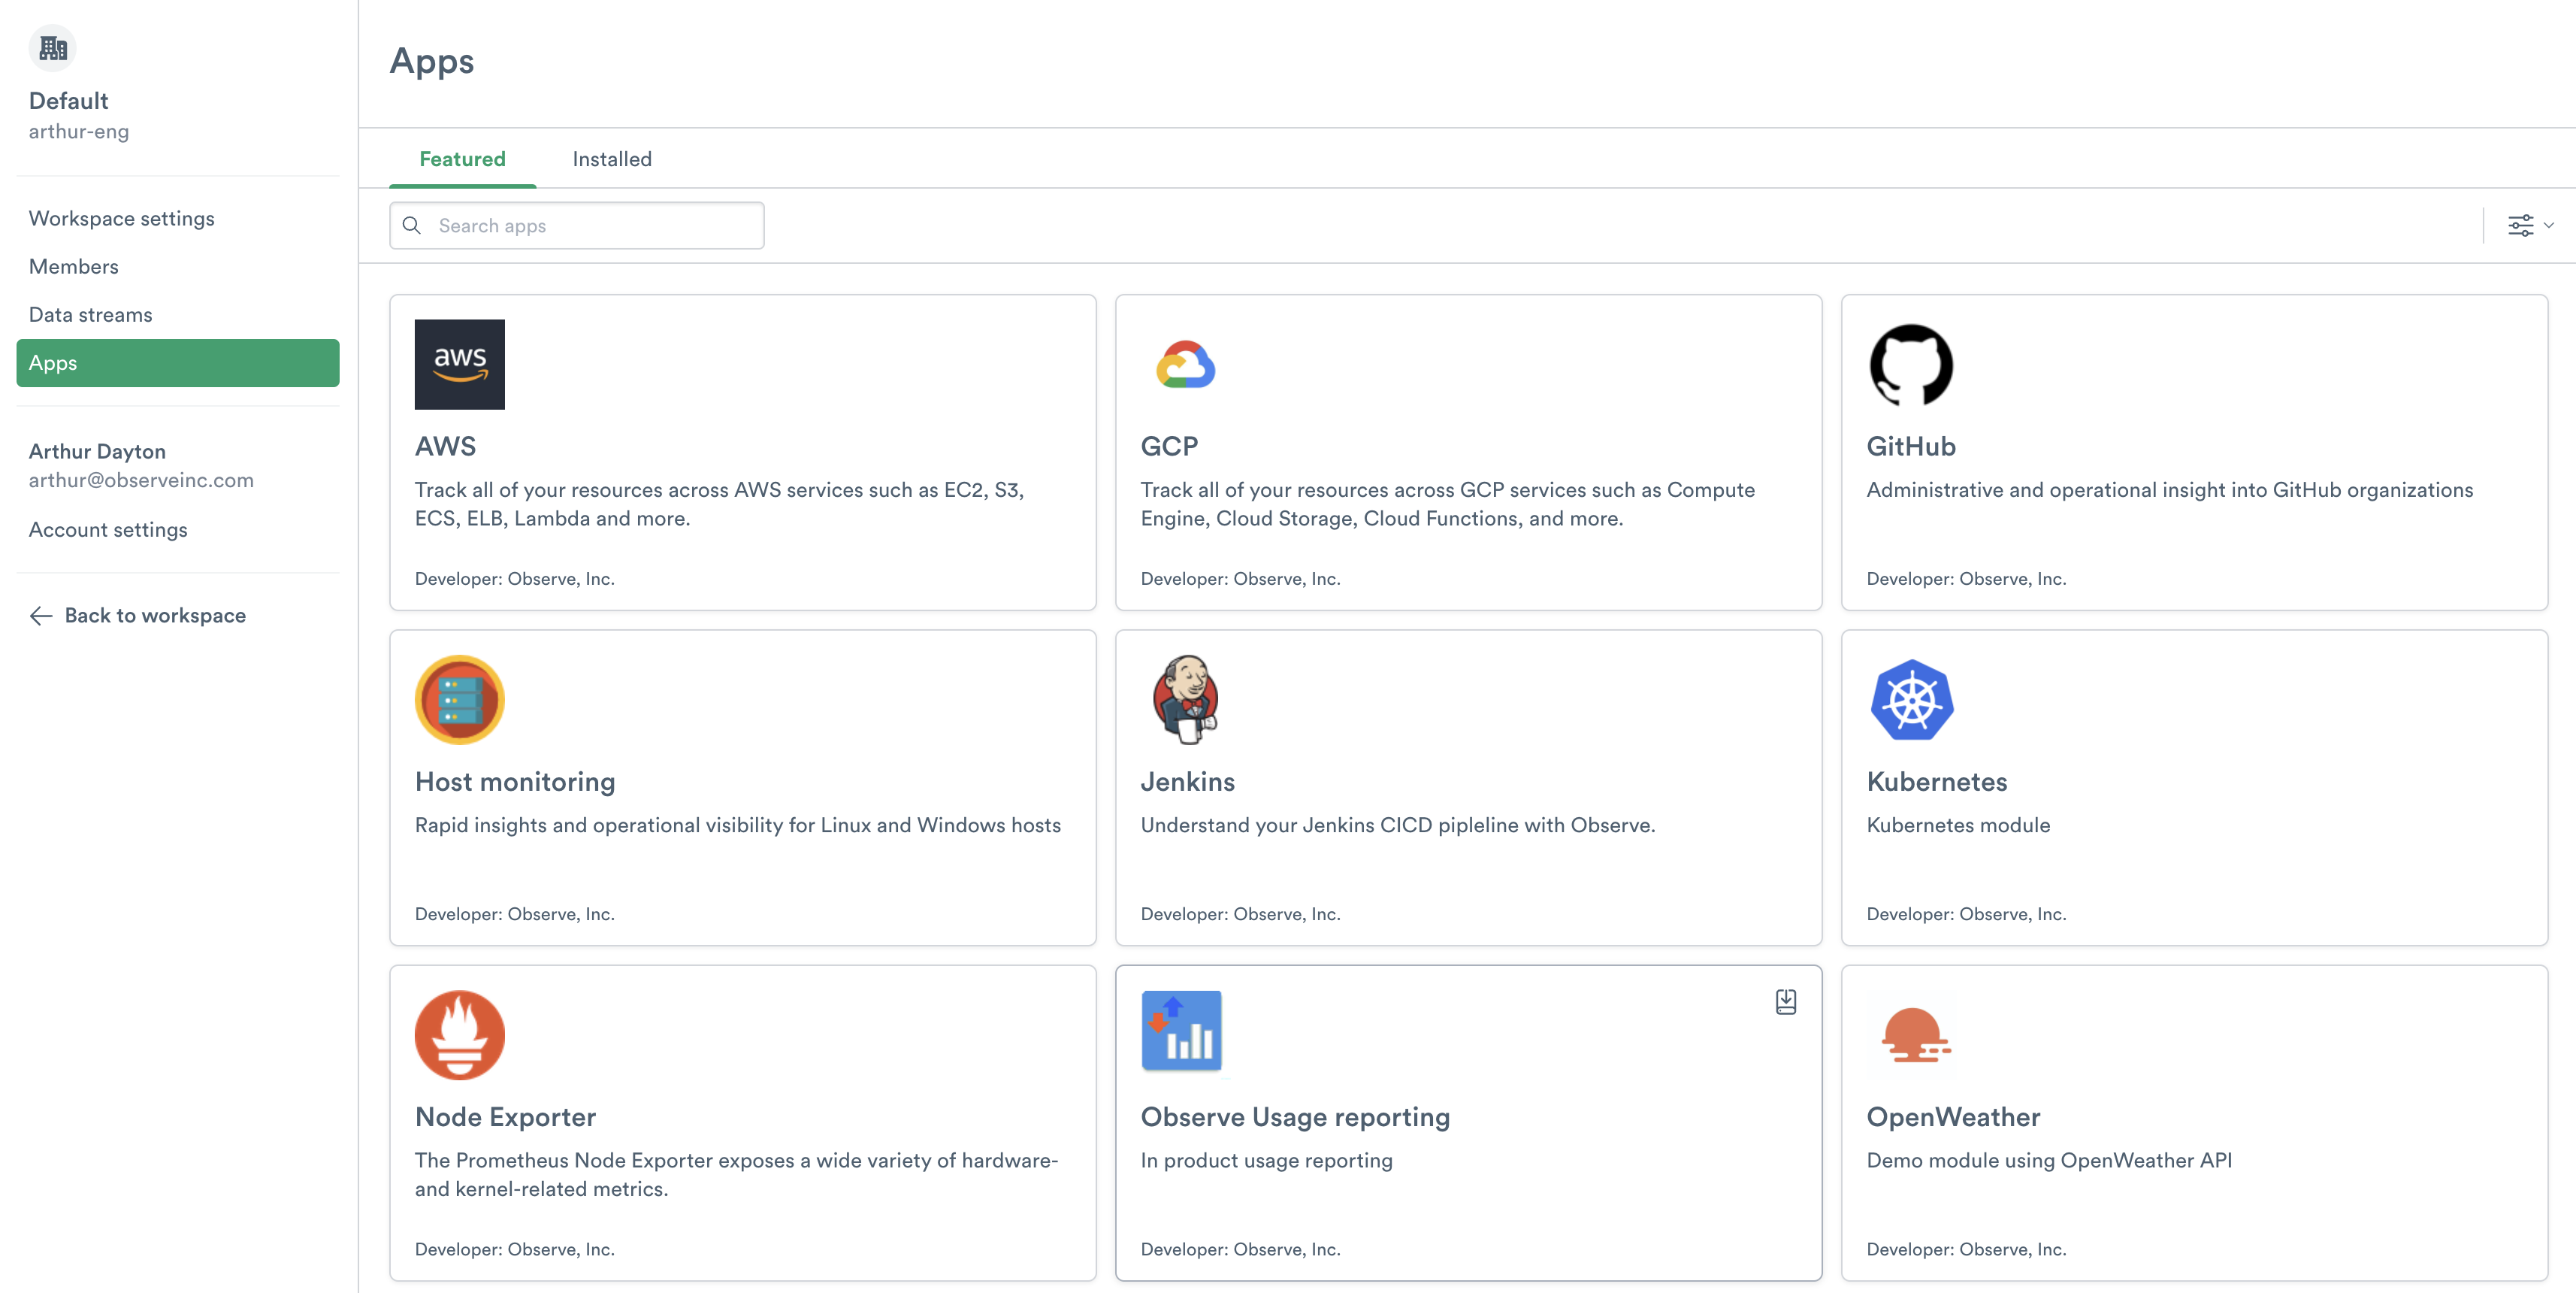
Figure 22 - Apps on Observe
Select the GCP App.
Click Install.
Chose one of the two options:
Recommended - installs the recommended Observe content, which can be modified later. Click Continue to proceed.
Manual Install - allows you to customize the Observe datastream used and app content installed. Click Continue to proceed.
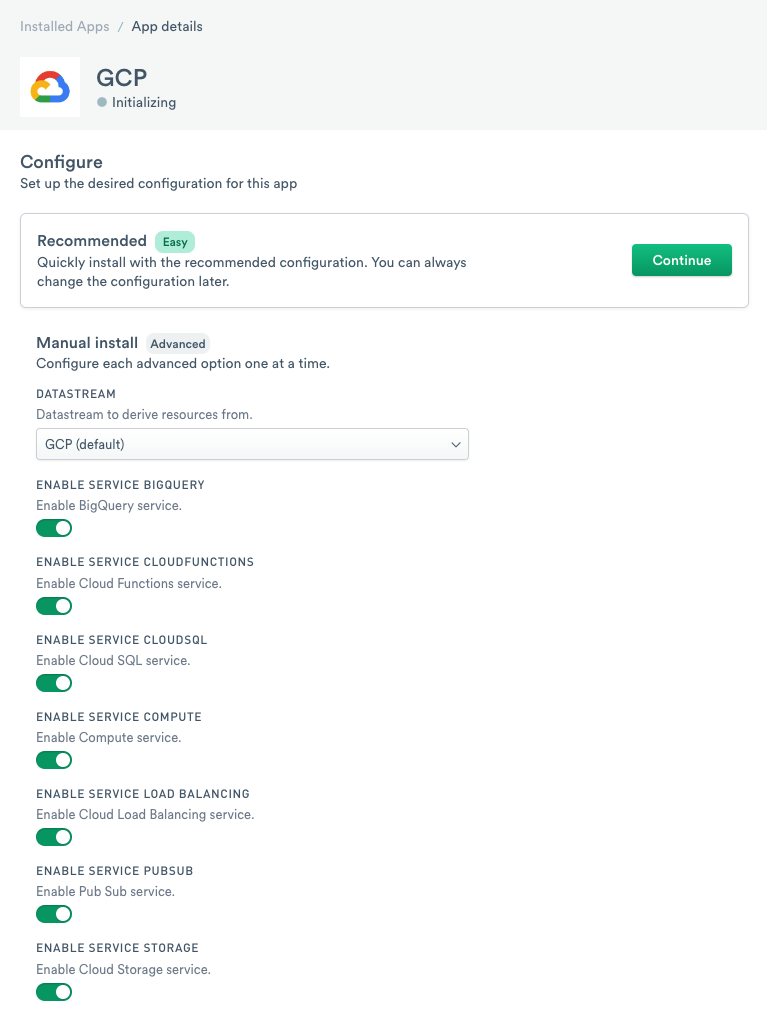
Figure 23 - List of available GCP services on Observe
Click Connections.
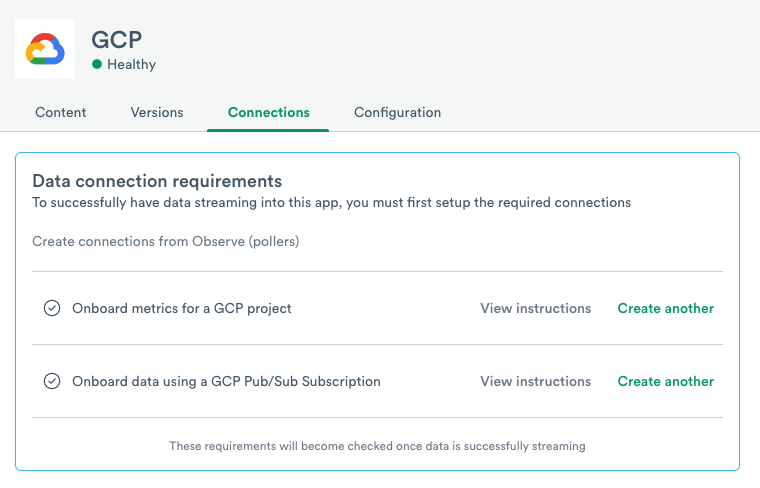
Figure 24 - Creating the connection for GCP Integrations
2. Next to Onboard metrics for a GCP project, click Create Connection.
3. For the GCP Project ID, enter your Google Project ID.
4. For the Service Account Private Key JSON, enter the entire JSON string you either generated with Terraform, downloaded from the GCP Console.
Note
Be sure to grab the content starting and ending with the curly braces ({ “json”: “data”}) without leading or trailing whitespace for the service account JSON. Extra line breaks can cause errors when trying to add the configuration.
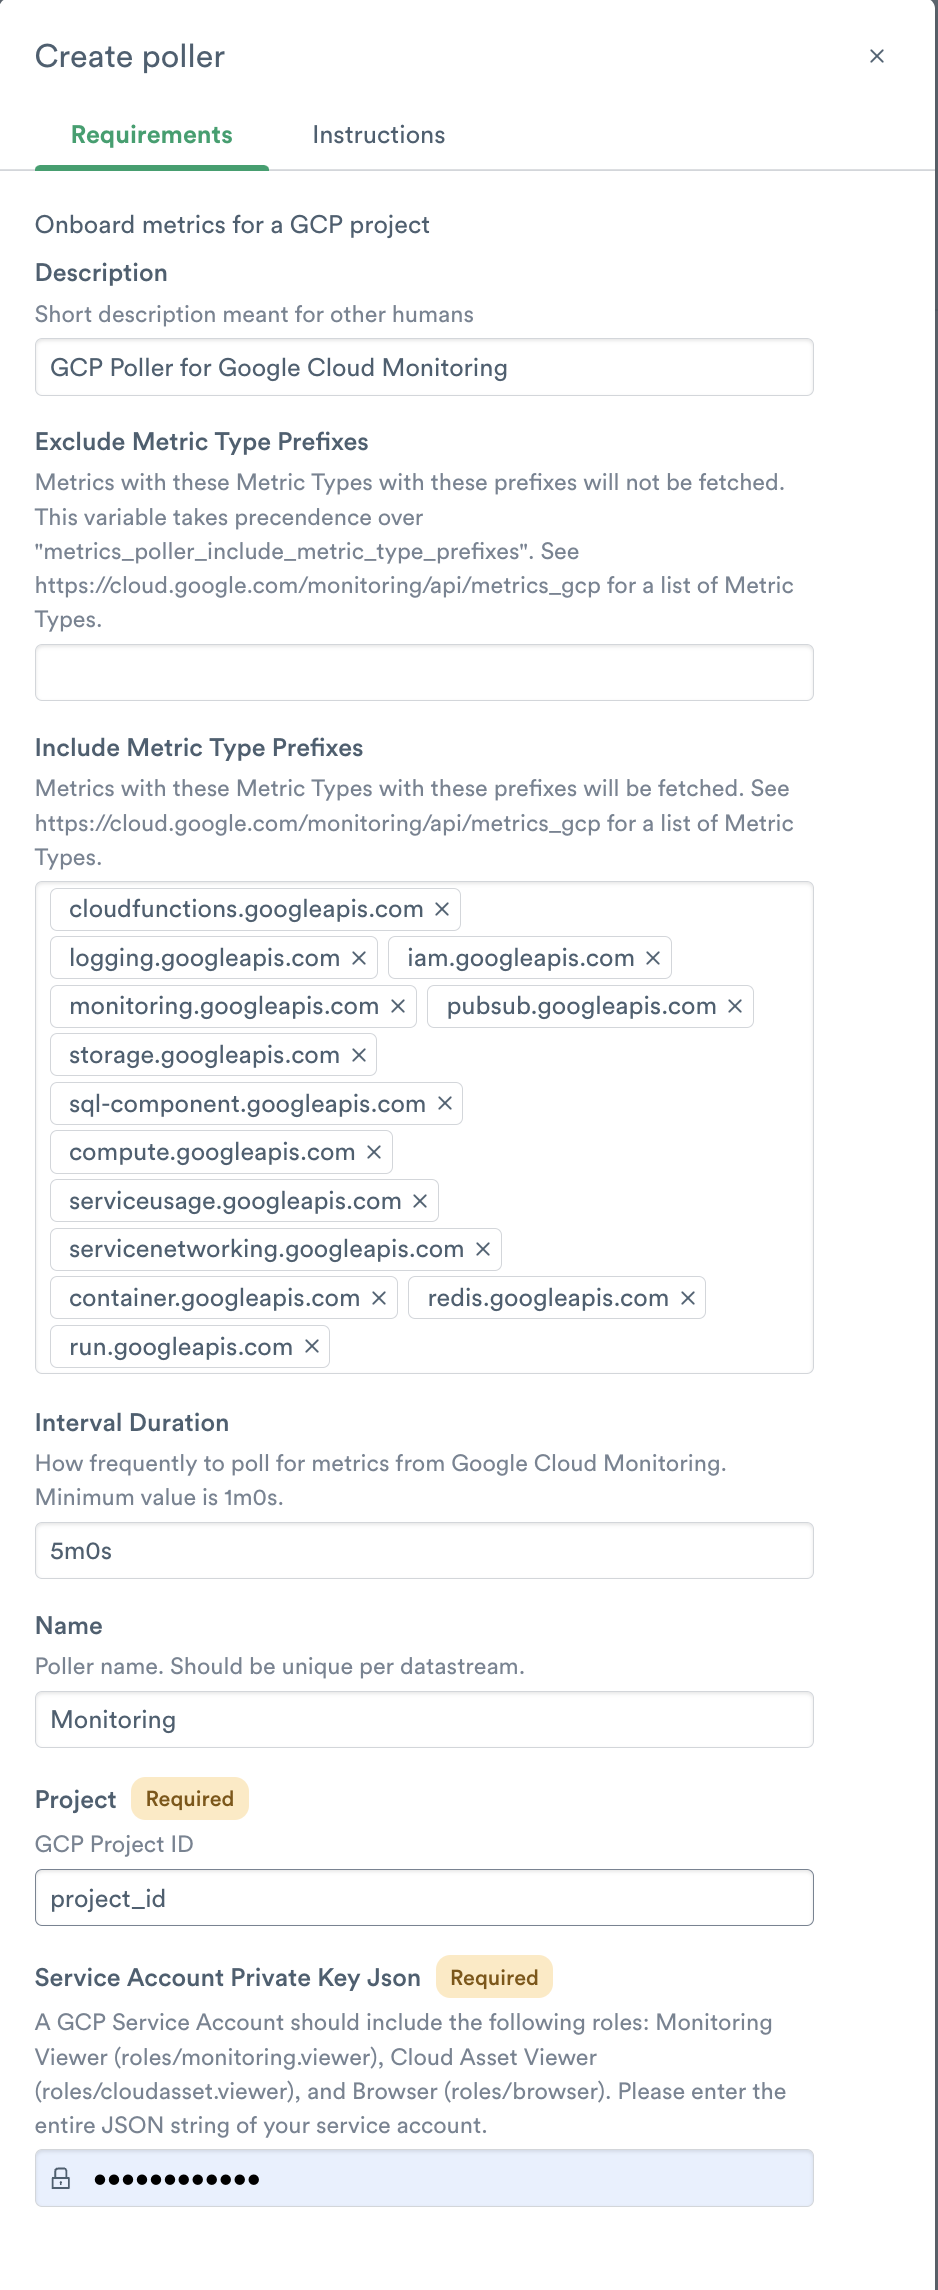
Figure 25 - Creating the poller for GCP Integrations
5. Next to Onboard data using a GCP Pub/Sub Subscription, click Create Connection.
6. For the GCP project ID, enter your Google Project ID.
7. For the Service Account Private Key JSON, enter the entire JSON string you either generated with Terraform or downloaded from the GCP Console.
Note
Be sure to grab the content starting and ending with the curly braces ({ “json”: “data”}) without leading or trailing whitespace for the service account JSON. Extra line breaks can cause errors when trying to add the configuration.
8. For the GCP Pub/Sub Subscription, enter the Subscription Name you noted in the Terraform, or in the GCP Console setup.
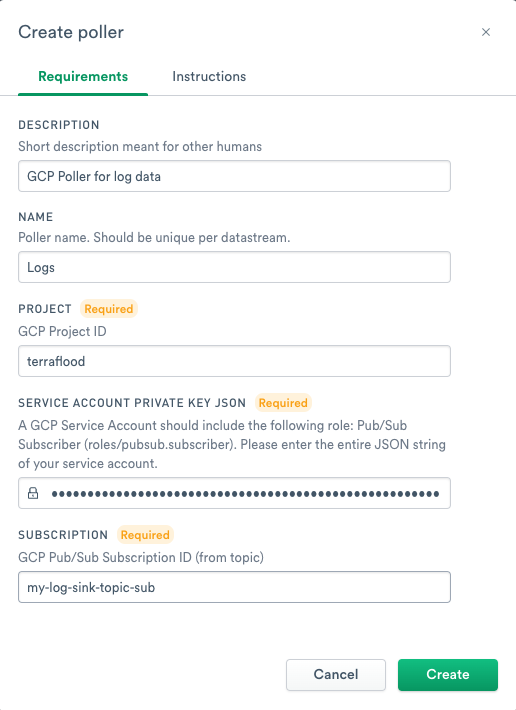
Figure 26 - Creating the poller for Pub/Sub subscriptions
9. Verify that Observe ingests the GCP data.
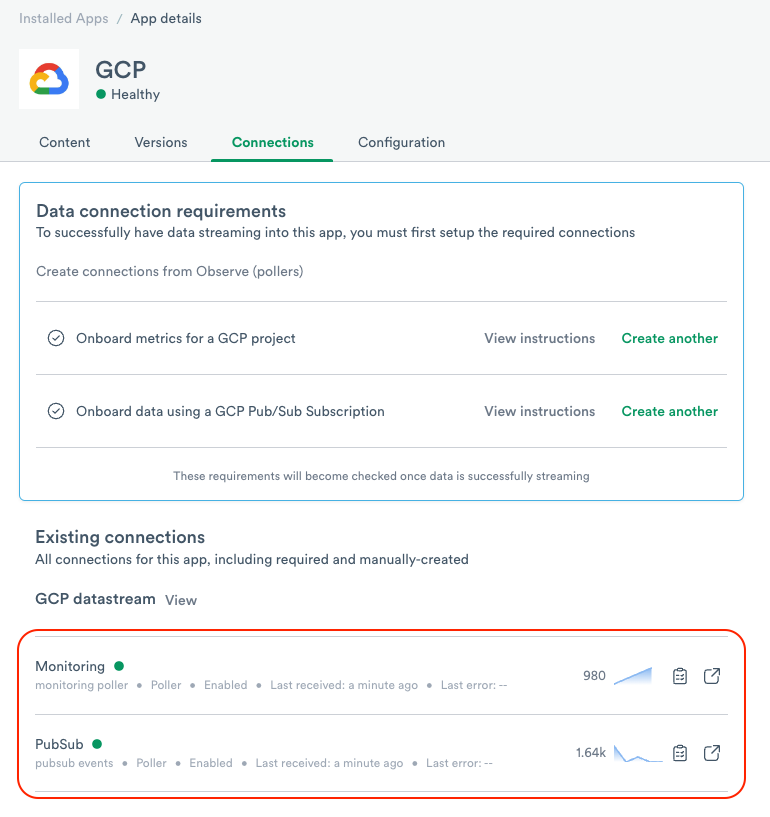
Figure 27 - Verify the connections
Uninstalling the GCP App
Observe Collection
To uninstall GCP collection, remove the observe-gcp-collection module by running the following in the root directory:
$ terraform destroy
The command removes the associated Service Accounts, Pub/Sub Topics, Log Sinks, and the data collection Cloud Function. This does not affect any enabled APIs GCP Console.
Service Account Private Keys also cease to work in the GCP app connections.
If you performed the deployment using the Deployment Manager, then you can delete it using the following commands:
$ gcloud beta deployment-manager deployments delete observe
The command removes the associated Service Accounts, Pub/Sub Topics, Log Sinks, and the data collection Cloud Function. This does not affect any enabled APIs GCP Console.
Service Account Private Keys also stop working in the GCP app connections.
To uninstall using the GCP Console, follow these steps:
Navigate to Service Account.
Under Email, select the Service Account Emails created in the installation steps.
Click Delete to delete the Service Accounts.
These should be associated with these sample descriptions:
For my Observe Poller
For data collection Cloud Function
For triggering the data collection Cloud Function via Scheduler
Navigate to Topics.
Select the Topic ID created in the installation steps.
Click Delete to delete the Pub/Sub Topic.
Navigate to Log Router
Select the Log Router Sink created in the installation steps for Observe Pub/Sub Topic.
Click Delete to delete the Log Router Sink.
Navigate to Cloud Functions
Select the Function created in the installation steps.
Click Delete to delete the Function.
Navigate to Cloud Scheduler
Select the Scheduler Job created in the installation steps.
Click the Delete icon to delete the Scheduler Job.
Service Account Private Keys also stop working in the GCP app connections.
Optionally, disable the following APIs GCP Console:
Baseline:
Service-specific:
GCP App
To uninstall the GCP app from your Observe workspace, follow the instructions located at Apps page.
To uninstall the GCP pollers, follow the instructions located at Github Poller Upgrade page.