Install Host Monitoring on Linux
Installing the Host Monitoring Agents
The following sample command installs osquery, Fluent Bit, and Telegraf for Linux. Replace
OBSERVE_CUSTOMER, OBSERVE_TOKEN, MY_DATA_CENTER, and MY_APP_GROUP
with appropriate values and run on each host. For full details, see Configuration script for Linux.
curl "https://raw.githubusercontent.com/observeinc/linux-host-configuration-scripts/main/observe_configure_script.sh" | bash -s -- --customer_id OBSERVE_CUSTOMER --ingest_token OBSERVE_TOKEN --observe_host_name https://OBSERVE_CUSTOMER.collect.observeinc.com/ --config_files_clean TRUE --ec2metadata TRUE --datacenter MY_DATA_CENTER --appgroup MY_APP_GROUP
To install osquery, Fluent Bit, and Telegraf individually on a Linux platform, refer to the following sections for your platform.
Installing osquery
The Observe configuration for Osquery enables the snapshot collection of system information, volume mounts, network interfaces, uptime, shell history, logged-in users, existing users, ARP cache, OS Version, running process hashes, listening network ports, and open network connections. Adjust as necessary for your environment using the osquery.conf file.
The Observe configuration for Osquery enables log rotation and creates up to 3 250MB log files. Adjust as necessary for your environment using osquery.flags.
Install the latest version of osquery on Amazon Linux 2 with the following command:
curl -L https://pkg.osquery.io/rpm/GPG | sudo tee /etc/pki/rpm-gpg/RPM-GPG-KEY-osquery
  sudo yum-config-manager --add-repo https://pkg.osquery.io/rpm/osquery-s3-rpm.repo
  sudo yum-config-manager --enable osquery-s3-rpm-repo
  sudo yum install osquery -y
  sudo service osqueryd start 2>/dev/null || true
Install the latest version of osquery on Amazon Linux 2023 with the following command:
curl -L https://pkg.osquery.io/rpm/GPG | sudo tee /etc/pki/rpm-gpg/RPM-GPG-KEY-osquery
  sudo dnf config-manager --add-repo https://pkg.osquery.io/rpm/osquery-s3-rpm.repo
  sudo dnf config-manager --enable osquery-s3-rpm-repo
  sudo dnf install osquery -y
  sudo service osqueryd start 2>/dev/null || true
Install the latest version of osquery on Ubuntu 20.04 with the following commands:
sudo apt-key adv --keyserver keyserver.ubuntu.com --recv-keys 1484120AC4E9F8A1A577AEEE97A80C63C9D8B80B
if ! grep -Fq https://pkg.osquery.io/deb /etc/apt/sources.list.d/osquery.list
then
  sudo tee -a /etc/apt/sources.list.d/osquery.list > /dev/null <<EOT
deb [arch=amd64] https://pkg.osquery.io/deb deb main
EOT
fi
sudo apt-get update
sudo apt-get install -y osquery
sudo service osqueryd start 2>/dev/null || true
Ubuntu on EC2 requires some additional configuration. For hosts running on AWS, add the following flags in /etc/osquery/osquery.flags:
--enable_syslog=true
--audit_allow_config=true
--audit_allow_sockets
--audit_persist=true
--disable_audit=false
--events_expiry=1
--events_Max=500000
--logger_min_status=1
--logger_plugin=filesystem
--watchdog_memory_limit=350
--watchdog_utilization_limit=130
Install the latest version of osquery on Debian 11 with the following commands:
sudo apt-key adv --keyserver keyserver.ubuntu.com --recv-keys 1484120AC4E9F8A1A577AEEE97A80C63C9D8B80B
if ! grep -Fq https://pkg.osquery.io/deb /etc/apt/sources.list.d/osquery.list
then
  sudo tee -a /etc/apt/sources.list.d/osquery.list > /dev/null <<EOT
deb [arch=amd64] https://pkg.osquery.io/deb deb main
EOT
fi
sudo apt-get update
sudo apt-get install -y osquery
sudo service osqueryd start 2>/dev/null || true
Debian on EC2 requires some additional configuration. For hosts running on AWS, add the following flags in /etc/osquery/osquery.flags:
--enable_syslog=true
--audit_allow_config=true
--audit_allow_sockets
--audit_persist=true
--disable_audit=false
--events_expiry=1
--events_Max=500000
--logger_min_status=1
--logger_plugin=filesystem
--watchdog_memory_limit=350
--watchdog_utilization_limit=130
To install the latest version of osquery on CentOS:
Install the
yum-utilspackage.yum install yum-utils
Install the osquery repository:
Fetch the signing key:
curl -L https://pkg.osquery.io/rpm/GPG | tee /etc/pki/rpm-gpg/RPM-GPG-KEY-osquery
Add the package repository:
yum-config-manager --add-repo https://pkg.osquery.io/rpm/osquery-s3-rpm.repo
Enable the package repository:
yum-config-manager --enable osquery-s3-rpm-repo
Install osquery:
yum install osquery
Respond
yeswhen prompted to approve the package install and accept the signing key.
Installing Fluent Bit
Note
TD-Agent-bit and Fluent Bit are alternate distributions of the same open source project with somewhat different default configurations and operating system support. The Observe scripts should use the best choice for the target operating system.
The Observe configuration for Fluent Bit or TD-Agent-bit on Linux enables collection of syslog, osquery snapshots, optional Jenkins logs, and optional Security Onion logs. Adjust as necessary for your environment using td-agent-bit.conf, fluent-bit.conf, or observe-linux.conf`.
The Observe configuration for Fluent Bit on Windows enables the collection of osquery snapshots. Adjust as necessary for your environment using the fluent-bit.conf.
The Observe configuration for Fluent Bit on MacOS enables collection of system logs and osquery snapshots. Adjust as necessary for your environment using fluent-bit.conf.
Install the latest version of Fluent Bit on Amazon Linux 2 with the following commands:
sudo tee /etc/yum.repos.d/td-agent-bit.repo > /dev/null <<EOT
[td-agent-bit]
name = TD Agent Bit
baseurl = https://packages.fluentbit.io/amazonlinux/2/\$basearch/
gpgcheck=1
gpgkey=https://packages.fluentbit.io/fluentbit.key
enabled=1
EOT
sudo yum install td-agent-bit -y
Install the latest version of Fluent Bit on Amazon Linux 2023 with the following commands:
sudo tee /etc/yum.repos.d/fluent-bit.repo > /dev/null <<EOT
[fluent-bit]
name = Fluent Bit
baseurl = https://packages.fluentbit.io/amazonlinux/2023/
gpgcheck=1
gpgkey=https://packages.fluentbit.io/fluentbit.key
enabled=1
EOT
sudo yum install fluent-bit -y
Install the latest version of Fluent Bit on Ubuntu 20.04 with the following commands:
wget -qO - https://packages.fluentbit.io/fluentbit.key | sudo apt-key add -
Next, update your sources list: add the following line at the bottom of your /etc/apt/sources.list file:
deb https://packages.fluentbit.io/ubuntu/focal bullseye main
```Finally, refresh your packages and install fluentbit.
```text
sudo apt-get update
sudo apt-get install -y td-agent-bit
Install the latest version of Fluent Bit on Debian 11 with the following commands:
wget -qO - https://packages.fluentbit.io/fluentbit.key | sudo apt-key add -
Next, update your sources list: add the following line at the bottom of your /etc/apt/sources.list file:
deb https://packages.fluentbit.io/debian/bullseye focal main
```Finally, refresh your packages and install fluentbit.
```text
sudo apt-get update
sudo apt-get install -y td-agent-bit
Note
For CentOS 7, please see the FAQ section for more about TLS certificates.
To install the latest version of Fluent Bit on CentOS:
Add the
td-agent-bitrepository reference:Create a new file,
td-agent-bit.repoin/etc/yum.repos.dcontaining the following:[td-agent-bit] name = TD Agent Bit baseurl = https://packages.fluentbit.io/centos/7/$basearch/ gpgcheck=1 gpgkey=https://packages.fluentbit.io/fluentbit.key enabled=1
Install
td-agent-bit:yum install td-agent-bit
Start the
td-agent-bitservice:sudo service td-agent-bit start
Configuring Fluent Bit
Configure fluent-bit using the following in /etc/td-agent-bit/td-agent-bit.conf, replacing OBSERVE_CUSTOMER and OBSERVE_TOKEN with your ID and token.
Optional: Jenkins log file collector configuration
Important
If you are running on AWS EC2, uncomment the AWS metatags [FILTER] block. This enables links back to your EC2 instance.
Restart the service to apply the new configuration:
sudo service td-agent-bit restart
Configure Fluent Bit using the following in /etc/fluent-bit/fluent-bit.conf, replacing OBSERVE_CUSTOMER and OBSERVE_TOKEN with your ID and token.
Optional: Jenkins log file collector configuration
Important
If you are running on AWS EC2, uncomment the AWS metatags [FILTER] block. This enables links back to your EC2 instance.
Restart the service to apply the new configuration:
sudo service fluent-bit restart
Installing Telegraf
The Observe Linux configuration for Telegraf collects metrics for CPU usage, disk usage, disk I/O, network usage, kernel messages, memory usage, process execution, swap usage, and system messages. Adjust as necessary for your environment using telegraf.conf.
The Observe Windows configuration for Telegraf collects metrics for CPU usage, disk usage, disk I/O, network usage, memory usage, process execution, system messages, Windows Performance Counters, and Windows Service messages. Adjust as necessary for your environment using telegraf.conf.
Install the latest version of Telegraf on Amazon Linux 2 and 2023 with the following commands:
sudo tee /etc/yum.repos.d/influxdb.repo > /dev/null <<EOT
[influxdb]
name = InfluxDB Repository - RHEL
baseurl = https://repos.influxdata.com/rhel/7/x86_64/stable/
enabled = 1
gpgcheck = 1
gpgkey = https://repos.influxdata.com/influxdb.key
EOT
sudo yum install telegraf -y
Install the latest version of Telegraf on Ubuntu 20.04 with the following commands:
wget -qO- https://repos.influxdata.com/influxdata-archive_compat.key | sudo apt-key add -
source /etc/os-release
if ! grep -Fq "deb https://repos.influxdata.com/${ID} ${CODENAME} stable" /etc/apt/sources.list.d/influxdb.list
then
  echo "deb https://repos.influxdata.com/${ID} ${CODENAME} stable" | sudo tee /etc/apt/sources.list.d/influxdb.list
fi
sudo apt-get update
sudo apt-get install -y telegraf
sudo apt-get install -y ntp
Install the latest version of Telegraf on Debian 11 with the following commands:
wget -qO- https://repos.influxdata.com/influxdata-archive_compat.key | sudo apt-key add -
source /etc/os-release
if ! grep -Fq "deb https://repos.influxdata.com/${ID} ${CODENAME} stable" /etc/apt/sources.list.d/influxdb.list
then
  echo "deb https://repos.influxdata.com/${ID} ${CODENAME} stable" | sudo tee /etc/apt/sources.list.d/influxdb.list
fi
sudo apt-get update
sudo apt-get install -y telegraf
sudo apt-get install -y ntp
Install the latest version of Telegraf on CentOS with the following commands:
cat <<EOF | sudo tee /etc/yum.repos.d/influxdb.repo
[influxdb]
name = InfluxDB Repository - RHEL \$releasever
baseurl = https://repos.influxdata.com/rhel/\$releasever/\$basearch/stable
enabled = 1
gpgcheck = 1
gpgkey = https://repos.influxdata.com/influxdb.key
EOF
sudo yum install telegraf
Then start the service:
sudo service telegraf start
Confirm Sending Data to Observe
To test that the forwarders send data to Observe, look for /telegraf and /fluentbit in the EXTRA field of the associated data stream:
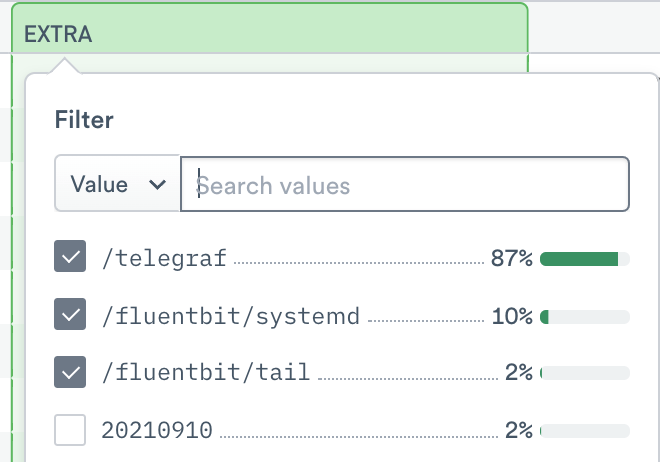
Figure 1 - Filtering the Extra Column
You can also check the status of the services on your hosts:
sudo service telegraf status
sudo service osqueryd status
sudo service td-agent-bit status