Install Host Monitoring on Windows
Installing the Host Monitoring Agents
The following sample command installs osquery, Fluent Bit, and Telegraf for Windows.
Replace OBSERVE_CUSTOMER and OBSERVE_TOKEN with the appropriate values and run on each host. Optionally set the name of the Observe collection host by appending -observe_host_name OBSERVE_HOST_NAME. You may also set additional optional parameters, for full details, see Configuration script for Windows.
[Net.ServicePointManager]::SecurityProtocol = "Tls, Tls11, Tls12, Ssl3"; Invoke-WebRequest -UseBasicParsing "https://raw.githubusercontent.com/observeinc/windows-host-configuration-scripts/main/agents.ps1" -outfile .\agents.ps1; .\agents.ps1 -ingest_token OBSERVE_TOKEN -customer_id OBSERVE_CUSTOMER
To install osquery, Fluent Bit, and Telegraf individually on a Windows platform, refer to the following sections.
Installing osquery
The Observe configuration for osquery enables snapshot collection of system info, volume mounts, network interfaces, uptime, shell history, logged-in users, existing users, ARP cache, OS Version, running process hashes, listening network ports, and open network connections. Adjust as necessary for your environment using osquery.conf.
The Observe configuration for osquery enables log rotation and creates up to 3 250MB log files. Adjust as necessary for your environment using osquery.flags.
To install the latest version of osquery on Microsoft Windows:
Download the latest MSI for Windows from the Osquery Downloads page
Launch the MSI and follow the instructions on the screen.
Osquery configuration
Configure osquery by creating the following configuration in C:\Program Files\osquery\osquery.conf. If you have installed osquery in a non-default location, create this file in your installation directory.
Set osquery flags using the following in C:\Program Files\osquery\osquery.flags
Once you write the configuration, open a PowerShell window and run the following command to restart the osquery service:
Restart-Service osqueryd
Installing Fluent Bit
Note
TD-Agent-bit and Fluent-bit are alternate distributions of the same open source project with somewhat different default configurations and operating system support. The Observe scripts should use the best choice for the target operating system.
The Observe configuration for Fluent Bit on Windows enables the collection of osquery snapshots. Adjust as necessary for your environment using fluent-bit.conf.
Install version 2.0.9 of Fluent Bit on Windows by following these steps:
Download the 2.0.9 installer EXE from the Fluent Bit Downloads Page.
Double-click the installer and follow the instructions on the installation wizard.
The following assumes that Fluent Bit is installed in the default location of C:\Program Files\fluent-bit.
3. Configure Fluent Bit using the following in C:\Program Files\fluent-bit\fluent-bit.conf, replacing OBSERVE_CUSTOMER and OBSERVE_TOKEN with your ID and token.
4. Next, create a service with the following command in a PowerShell window:
New-Service fluent-bit -BinaryPathName '"C:\Program Files\fluent-bit\bin\fluent-bit.exe" -c "C:\Program Files\fluent-bit\conf\fluent-bit.conf"' -StartupType Automatic Start-Service fluent-bit
Installing Telegraf
The Observe Windows configuration for Telegraf collects metrics for CPU usage, disk usage, disk I/O, network usage, memory usage, process execution, system messages, Windows Performance Counters, and Windows Service messages. Adjust as necessary for your environment using the telegraf.conf file.
Install the latest version of Telegraf by performing these steps:
Download the latest version of Telegraf from the InfluxData Downloads page.
Extract the contents of the ZIP archive to `C:\Program Files\InfluxData\Telegraf.
The downloaded zip file, when extracted, produces this location:
PS C:\Users\Administrator> dir C:\Users\Administrator\Downloads\telegraf-1.26.0_windows_amd64\telegraf-1.26.0

Directory: C:\Users\Administrator\Downloads\telegraf-1.26.0_windows_amd64\telegraf-1.26.0


Mode                LastWriteTime         Length Name
------                -------------         ------ ----
------        3/13/2023   8:14 PM         450662 telegraf.conf
------        3/13/2023   8:16 PM      165015024 telegraf.exe
Note
Make sure to put telegraf.exe and telegraf.conf directly into C:\Program Files\InfluxData\Telegraf folder to produce C:\Program Files\InfluxData\Telegraf\telegraf.exe and C:\Program Files\InfluxData\Telegraf\telegraf.conf
Confirm Sending Data to Observe
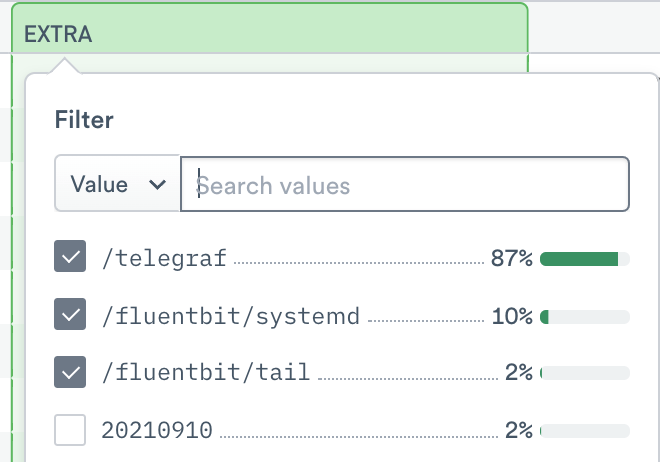
To test that the forwarders send data to Observe, look for /telegraf and /fluentbit in the EXTRA field of the associated data stream:

Figure 1 - Selecting telegraf and fluent bit in the Extra Column
In a PowerShell window, run the following commands:
Get-Service telegraf
Get-Service osqueryd
Get-Service fluent-bit