Creating an alert for Jira tickets
Note
This document refers to the legacy alerting system, known as Monitors v1. See Monitors and Alerts for the updated version (v2). Note that all v1 Monitors will continue to function and are not deprecated. We advise users to create new monitors via the updated version.
Atlassian created Jira software as a suite of agile work management solutions that powers collaboration across all teams.
You can configure Observe monitors to create Jira tickets upon an alert. This may be useful to track code changes or if someone finds an issue that needs resolution. Whatever the reason may be, you can receive notifications for Jira tickets using the following instructions to create a ticket when a monitor fires.
Prerequisites
Before you begin configuring an alert in Observe, you must have the following information available:
Permissions required - Browse projects and Create issues project permissions for the project in which the issue or subtask is to be created
A Jira API token - create a Jira API token for your account by going to Account Settings>Security Settings>API tokens in Jira.
Your Jira account ID - Log into Jira, and click People. Then click on your name. The account ID appears in the URL for your profile:
https://yourcompany.atlassian.net/jira/people/123abc4567d8e901f2g3h4i5
Once you have an API token, you can generate a test ticket using the following curl:
curl -X POST
	--user [email protected]:abCDeF1gHij2kLmN3oPQRST4
	--data-binary '...'
	-H "Content-Type: application/json"
	'https://yourcompany.atlassian.net/rest/api/2/issue'
You need an example of a data-binary for your Jira instance such as the following:
{
    "fields":
    {
        "summary": "Test (autobug) Your company alert to Jira ticket test",
        "issuetype":
        {
            "id": "00000"
        },
        "project":
        {
            "id": "00000"
        },
        "assignee":
        {
            "id": "123abc4567d8e901f2g3h4i5"
        },
        "priority":
        {
            "id": "2"
        },
        "description": "Describe event"
    },
    "update":
    {
        "customfield_00000":
        [
            {
                "add":
                {
                    "id": "00000"
                }
            }
        ]
    }
Use values from your Jira instance to fill in the fields. You may need to ask your Jira administrator for this information. Alternatively, you can retrieve the field values by querying for an existing Jira ticket through the API by replacing the ticket ID example with your ticket ID:
curl -X GET --user [email protected]:abCDeF1gHij2kLmN3oPQRST4 'https://yourcompany.atlassian.net/rest/api/latest/issue/ID-12345'
To test the final command to create a ticket from the terminal, use the following format:
curl -X POST --user [email protected]:abCDeF1gHij2kLmN3oPQRST4 --data-binary '{"fields": {"summary": “Bug Description”, "issuetype": {"id": “00000”}, "project": {"id": “00000”}, "assignee": {"id": "123abc4567d8e901f2g3h4i5"}, "priority": {"id": "2"}, "description": “Bug Details "}, "update": {"customfield_00000”: [{"add": {"id": “00000”}}]}}’ -H "Content-Type: application/json" 'https://yourcompany.atlassian.net/rest/api/2/issue'
Note
Observe highly recommends manually testing your API commands and fields before you begin configuring an alert to ensure that your sample works as expected.
Before you begin the next task, you need to convert your token into a Basic base64 key. Do this, for example, by using Python to run the following code:
>>>import base64
>>>print(base64.b64encode(b'you@yourcompany:abCDeF1gHij2kLmN3oPQRST4'))
b'eW91QHlvdXJjb21wYW55OmFiQ0RlRjFnSGlqMmtMbU4zb1BRUlNUNA=='
You need the text between the single quotes for the authorization token.
Creating the Observe Shared Action
Configure your Shared Action using the following steps:
From the left navigation panel, click Monitors, and then click Shared Actions.
Shared Action Content
Enter your URL in the URL field, in this example, https://yourcompany.atlassian.net/rest/api/2/issue.
Select Post as the Method.
In the Headers section, enter Authorization = Basic eW91QHlvdXJjb21wYW55OmFiQ0RlRjFnSGlqMmtMbU4zb1BRUlNUNA==.
Click Add Key-Value Pair.
Enter Content-Type = application/json.
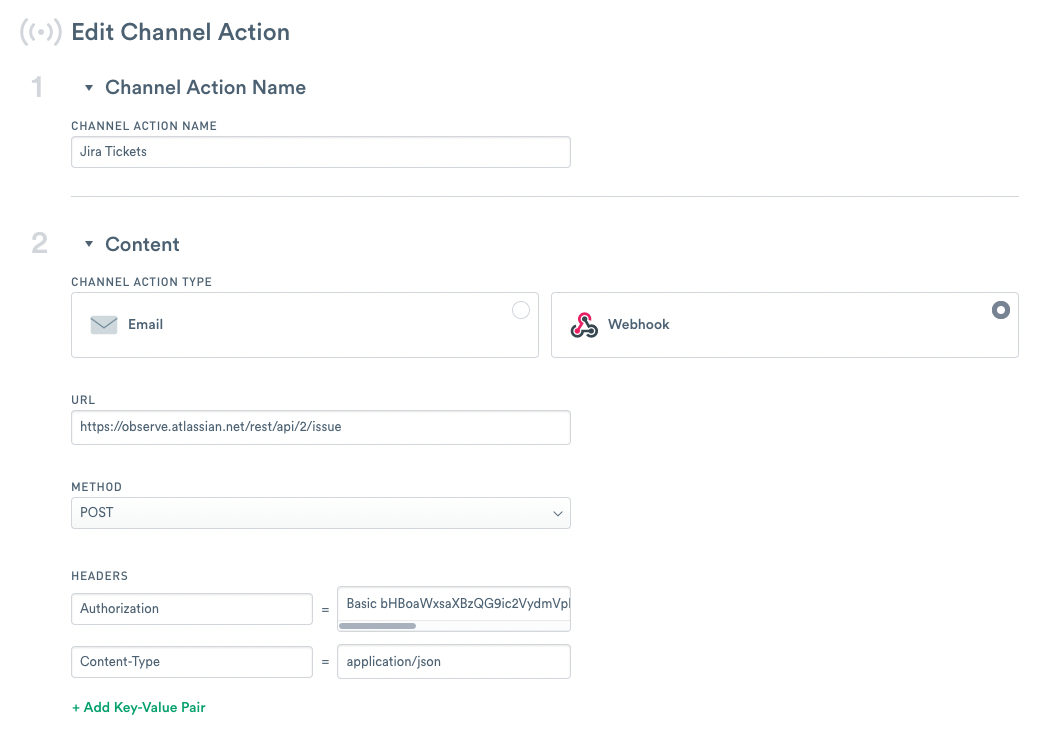
Figure 1 - Channel Action Content
In the Body field, paste your data-binary code. For example:
{
    "fields":
    {
        "summary": "{{notification.title}} Observe alert to Jira ticket test",
        "issuetype":
        {
            "id": "00000"
        },
        "project":
        {
            "id": "00000"
        },
        "assignee":
        {
            "id": "61080c8bfc68c10069d0adab"
        },
        "priority":
        {
            "id": "2"
        },
        "description": "{{notification.description}}"
    },
    "update":
    {
        "customfield_00000":
        [
            {
                "add":
                {
                    "id": "00000"
                }
            }
        ]
    }
}
Note
{{notification.title}} and {{notification.description}} are customizable variables. Notification variables contain details of the notification, such as when the alert triggered and the resources or values that triggered it.
In the Sample Data and Preview section, click Send Test New Notification. If there are no errors, you see No errors detected which means your code works for the Shared Action. You should also check Jira to ensure the ticket was created.
Figure 2 - Shared Action Body
Click Save.

Figure 2 - Channel Action Delivery
Creating the Jira Ticket Monitor and Alert
After you create a Shared Action, you create a Monitor and an Alert for your Jira tickets. Use the following steps to create a Monitor:
From the left navigation panel, click Monitors.
Click Create New Monitor.
Click on Promotion to create a Promotion monitor.
From the list of available datasets, select a dataset that you want to monitor.
Run the following OPAL to create the fields description and title:
filter msg = "important problem that needs a Jira ticket"
make_col
    title:strcat("A problem occurred in ", node),
    description:strcat(
      "Example Problem\n\n",
      "Account: ", account, "\n",
      "Node: ", node, "\n",
      "NodeID: ", string(nodeID), "\n",
      "Time (UTC): ", format_time(timestamp, 'YYYY-MM-DD"T"HH24:MI:SSTZH:TZM'), "\n\n",
      // mention someone in the ticket
      "CC [~accountid:123abc4567d8e901f2g3h4i5]")
In the Monitor section under Description, select description as the field to identify the Notification.
Select title as the Notification Kind.
In the Primary Key field, select description and title.
In the Notification section under Grouping, select Informational.
From the list of Channels, select the Channel you previously created, Test Jira.
For the Monitor Name, enter Jira Tickets.
Click Save.