Alerting example: Shared actions and monitors
Note
This document refers to the legacy alerting system, known as Monitors v1. See Monitors and Alerts for the updated version (v2). Note that all v1 Monitors will continue to function and are not deprecated. We advise users to create new monitors via the updated version.
The following procedures provide you with an example that illustrates how Shared Actions work with Monitors to create alerts.
Example
You want to send an alert when too many errors occur in the TestWebApp application. Alerts should go to the owner of the application, a-developer@example.com, and a Slack channel, #test-web-app.
Use a Monitor to watch the number of errors and alert when it exceeds a threshold. You expect similar conditions for alerting in the future, so set up a Shared Action in advance:
From the left Navigation panel, select Monitors, and then Shared Actions.
Create a Shared Action for each type of recipient, email or Webhook.
Create a Monitor whose notifications send alerts to this Channel when the triggering condition occurs.
Monitor notifications may send alerts to multiple Channels, and a Shared Action may contain multiple actions. Shared Actions allow you to configure alerts for a group of recipients without selecting them individually for each new monitor.
You can also create Shared Actions when you create a Monitor.
Creating Shared Actions
A Shared Action sends a single type of alert. For multiple alert types or different alert messages for different recipients, create a Shared Action for each.
To send an email to a-developer@example.com, use the following steps:
From the left navigation panel, click Monitors, Shared Actions, and then New Shared Action.
Click in the New Action field and create a name for the Shared Action.
Under Action Type, select Email and add the recipient email address. You can add additional email addresses as well.
Create a subject for the email. For more about the message body, see Customizing Alert Messages
Under Sample Data and Preview, select Static Sample Data, the default Monitor type, or a Monitor from the Monitor Sample Data list.
The Notification Status defaults to New. Otherwise, Reminder, or Ended.
Click Send Test New Notification to send a sample email alert.
Click Continue to go to the Shared Action Name section.
Click Save to save the new Shared Action.
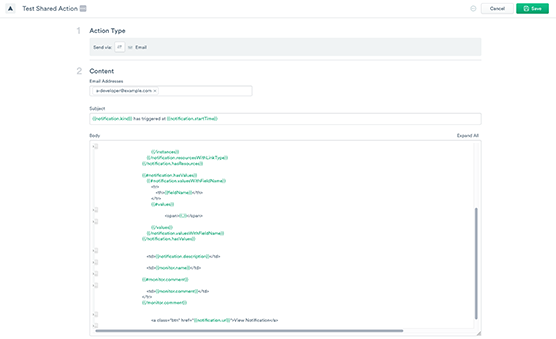
Figure 1 - Email notification example
Now create a second Shared Action for the Slack message:
Select the Slack template as the action type.
Click in the New Action field, and create a name for the action.
Fill in your Slack Webhook URL.
For the Method, select POST.
Under Headers, add a “Content-type” header with the value “application/json”.
In Body customize the body template to include the desired details. See Customizing alert messages for examples.
Under Sample Data and Preview, you can optionally send a test notification to Slack.
The Notification Status displays as New.
Under Sample Data and Preview, select a Monitor from the Monitor Sample Data list.
Click Save to save the configuration.
Note
You can send alerts to any service that accepts incoming Webhooks. To view Slack documentation, see Incoming Webhooks for Slack.
Creating a Monitor
After you create a Shared Action and create a Monitor, you only need to select the appropriate Monitor.
You want to trigger an alert when more than 50 errors occur in the previous 10 minutes, so you must create a Monitor with that condition.
From the left navigation, click Monitors.
You want to compare the number of events to a static value, so choose a Count monitor.
Under Trigger Conditions, set your desired condition:
greater than
50 (errors)
10 (time periods)
minutes (period size)
For more about condition options, see Monitor Notification Options.
Click Continue to go to the Notification section.
This is a basic count notification, so choose Don’t group.
You want this to be an urgent notification, so select Important.
In the Notifications that would have triggered section, you can see the number of events that would trigger a notification.
Under Actions, add a Custom description/comments.
Click Add Action to configure the notification type to send to recipients. You can select from the following types of actions:
Shared Action - an action previously configured in Shared Actions.
Email - displays the instructions for configuring a new Email Action.
Webhook - displays instructions for configuring a Webhook action.
Slack - displays instructions for configuring a Slack notification.
PagerDuty - displays instructions for configuring a PagerDuty notification.
Click Continue to configure Status Updates. You elect to have updates sent to you when the notification ends. Select Send reminders and configure the frequency you want to receive notifications. You can select from minutes, hours, days, or weeks.
Click Continue to go to the Monitor Name section.
Give your Monitor a meaningful name, such as “TestWebApp errors”.
Click Create to create the monitor.
Your new Monitor displays in the Monitors list:

Figure 3 - Monitors list
Adding a Monitor to a Dataset
You can create a monitor for a Dataset using the following steps:
Log into Observe and click Explore.
Click Datasets.
Select the dataset you want to monitor.
From the top of the panel, click Monitor.
Add a Monitor using the steps in Creating a Monitor.